Tuesday, December 11, 2018

RASPBERRY PI 2 MODEL B WITH TL-WN725N Version 2

#********************************************************************************
# RASPBERRY PI 2 MODEL B ON DEBIAN STRETCH 9.6
#********************************************************************************

root@raspime:~# cat /etc/debian_version
9.6

root@raspime:~# cat /etc/os-release
PRETTY_NAME="Raspbian GNU/Linux 9 (stretch)"
NAME="Raspbian GNU/Linux"
VERSION_ID="9"
VERSION="9 (stretch)"
ID=raspbian
ID_LIKE=debian
HOME_URL="http://www.raspbian.org/"
SUPPORT_URL="http://www.raspbian.org/RaspbianForums"
BUG_REPORT_URL="http://www.raspbian.org/RaspbianBugs"

root@raspime:~# uname -a
Linux raspime 4.14.79-v7+ #1159 SMP Sun Nov 4 17:50:20 GMT 2018 armv7l GNU/Linux

root@raspime:~# cat /proc/cpuinfo | grep Revision
Revision        : a01041

Note :
Hardware revision code from Cpuinfo for Pi 2 Model B is a01041 (Sony, UK) or a21041 (Embest, China).


If you are not sure for your TP-LINK wifi dongle version , please refer to this page
#*******************************************************************************
# WIFI DONGLE TL-WN725N Version 2
#*******************************************************************************

root@raspime:~# lsusb
Bus 001 Device 005: ID 0bda:8179 Realtek Semiconductor Corp. RTL8188EUS 802.11n Wireless Network Adapter


#*******************************************************************************
# DRIVER FOR TL-WN725N Version 2
#*******************************************************************************

root@raspime:~# sudo wget http://downloads.fars-robotics.net/wifi-drivers/install-wifi -O /usr/bin/install-wifi
root@raspime:~# sudo chmod +x /usr/bin/install-wifi
root@raspime:~# /usr/bin/install-wifi

Then run install-wifi to install driver automatically, for more information (updated information) please refer to this site



MINIDLNA - AUTO SCAN WHEN USB DISK INSERTED

READ THIS BEFORE CONTINUE

#
#*******************************************************************************
# RASPBERRY PI 2 MODEL B ON DEBIAN STRETCH 9.6
#*******************************************************************************
#
# /etc/os-release
#
root@raspime:~# cat /etc/os-release
PRETTY_NAME="Raspbian GNU/Linux 9 (stretch)"
NAME="Raspbian GNU/Linux"
VERSION_ID="9"
VERSION="9 (stretch)"
ID=raspbian
ID_LIKE=debian
HOME_URL="http://www.raspbian.org/"
SUPPORT_URL="http://www.raspbian.org/RaspbianForums"
BUG_REPORT_URL="http://www.raspbian.org/RaspbianBugs"

Instal needed package using this command
root@raspime:~# apt-get install udisks-glue policykit-1 supervisor

#
#*******************************************************************************
# MINIDLNA CONFIGURATION
#*******************************************************************************
#
# /etc/minidlna.conf
#
root@raspime:~# cat /etc/minidlna.conf

media_dir=V,/media/minidlna/MOVIES
media_dir=A,/media/minidlna/MUSICS
media_dir=P,/media/minidlna/PICTURES

friendly_name=Raspime Media Server
inotify=yes
notify_interval=30
db_dir=/var/cache/minidlna
log_dir=/var/log
log_level=warn


Check minidlna version
root@raspime:~# apt show minidlna

Package: minidlna
Version: 1.2.1-1
Status: install ok installed
Priority: extra
Section: checkinstall
Maintainer: diantokam@raspime
Installed-Size: 598 kB
Provides: minidlna
Download-Size: unknown
APT-Manual-Installed: yes
APT-Sources: /var/lib/dpkg/status
Description: MiniDLNA Version 1.2.1 Compiled December 4, 2018
Compiled for Debian 9.6 by  diantokam.blogspot.com


root@raspime:~# minidlnad -V

Version 1.2.1

#
# /etc/init.d/minidlna status
#
root@raspime:~# /etc/init.d/minidlna status

minidlna.service - LSB: minidlna server
Loaded: loaded (/etc/init.d/minidlna; generated; vendor preset: enabled)
Active: active (exited) since Thu 2018-12-06 20:00:02 WIB; 6min ago
Docs: man:systemd-sysv-generator(8)
Process: 7385 ExecStop=/etc/init.d/minidlna stop (code=exited, status=0/SUCCESS)
Process: 7395 ExecStart=/etc/init.d/minidlna start (code=exited, status=0/SUCCESS)

Dec 06 20:00:02 raspime systemd[1]: Started LSB: minidlna server.

#*******************************************************************************
# SUPERVISOR
#*******************************************************************************

root@raspime:~# cat /etc/supervisor/conf.d/minidlna_scanmedia.conf

[program:minidlna_scanmedia]
command=/usr/local/bin/minidlna_scanmedia.sh
autostart=true
autorestart=true
stdout_logfile=/var/log/supervisor/minidlna_scanmedia-out.log
stderr_logfile=/var/log/supervisor/minidlna_scanmedia-err.log


root@raspime:~# /etc/init.d/supervisor restart

[ ok ] Restarting supervisor (via systemctl): supervisor.service.


root@raspime:~# supervisorctl

minidlna_scanmedia               RUNNING   pid 10259, uptime 0:01:45
udisks-glue                      RUNNING   pid 10260, uptime 0:01:45

supervisor>

* Type quit for quit

#*******************************************************************************
# MINIDLNA_SCANMEDIA.SH
#*******************************************************************************
#
# /usr/local/bin/minidlna_scanmedia.sh
#
root@raspime:~# cat /usr/local/bin/minidlna_scanmedia.sh

#!/bin/bash
# Created by diantokam.blogspot.com
# December 8, 2018
# This script will runing continuous to check if any
# flashdisk mounted on /media/ by checking log from
# udisk-glue fromsupervisord


while :
do
cat /var/log/supervisor/udisks-glue-out.log | grep -v "BOOTLOADER" | grep media | grep Successfully
cat /var/log/supervisor/udisks-glue-out.log | grep media | grep Successfully
        if [ $? -eq 0 ]
                then
                echo `date`
                echo "mounted media successfully and minidlna will force-reload"
                sleep 10

                service minidlna force-reload
                sleep 5
                echo "" >/var/log/supervisor/udisks-glue-out.log
                break
        fi
                #echo "scan terus gan"
sleep 3
done


WHEN USB FLASHDISK INSERTED AND MOUNTED BY UDISK-GLUE

Supervisord continously run minidlna_scanmedia.sh until it recognize there is usb disk mounted on /media/SLAX9.4, it will run "service minidlna force-reload" and then clear "/var/log/supervisor/udisks-glue-out.log" so it becomes empty

#*******************************************************************************
#ACTION !
#*******************************************************************************
root@raspime:~# mount | grep media

/dev/sdb1 on /media/SLAX9.4 type fuseblk (rw,nosuid,nodev,noatime,sync,user_id=0,group_id=0,default_permissions,allow_other,blksize=4096,uhelper=udisks)


root@raspime:~# cat /var/log/supervisor/minidlna_scanmedia-out.log

Successfully automounted /dev/sdb1 at /media/SLAX9.4
Thu 6 Dec 20:31:43 WIB 2018
mounted media successfully and minidlna will force-reload

The script will then clear udisks-glue-out log

root@raspime:~# cat /var/log/supervisor/udisks-glue-out.log
** EMPTY **

Configure automount for usb drives using UDISK-GLUE and SUPERVISOR

#
#*******************************************************************************
# RASPBERRY PI 2 MODEL B ON DEBIAN STRETCH 9.6
#*******************************************************************************
#
# /etc/os-release
#
root@raspime:~# cat /etc/os-release
PRETTY_NAME="Raspbian GNU/Linux 9 (stretch)"
NAME="Raspbian GNU/Linux"
VERSION_ID="9"
VERSION="9 (stretch)"
ID=raspbian
ID_LIKE=debian
HOME_URL="http://www.raspbian.org/"
SUPPORT_URL="http://www.raspbian.org/RaspbianForums"
BUG_REPORT_URL="http://www.raspbian.org/RaspbianBugs"
root@raspime:~# apt-get install udisks-glue policykit-1 supervisor


#
#*******************************************************************************
# UDISK-GLUE
#*******************************************************************************
#
# /etc/udisks-glue.conf
#
root@raspime:~# cat /etc/udisks-glue.conf
filter disks {
    optical = false
    partition_table = false
    usage = filesystem
}

match disks {
           automount = true
          # For NTFS mount with read and write
           automount_options = { sync, noatime, 'dmask=0000', 'fmask=0000', 'umask=0000' }
           post_mount_command = "mount-notify mounted %device_file %mount_point"
           post_unmount_command = "mount-notify unmounted %device_file %mount_point"
}


#
#*******************************************************************************
# SUPERVISOR
#*******************************************************************************
#
# /etc/supervisor/supervisord.conf
#
root@raspime:~# cat /etc/supervisor/supervisord.conf
[unix_http_server]

[supervisord]

[rpcinterface:supervisor]
supervisor.rpcinterface_factory = supervisor.rpcinterface:make_main_rpcinterface

[supervisorctl]

[include]
files = /etc/supervisor/conf.d/*.conf
[inet_http_server]

# For web accesses
port=*:9001
username=admin
password=admin

#
# /etc/supervisor/conf.d/udisks-glue.conf
#
root@raspime:~# cat /etc/supervisor/conf.d/udisks-glue.conf
[program:udisks-glue]
user = root
command = udisks-glue -f
autostart = true
autorestart = true
stdout_logfile = /var/log/supervisor/udisks-glue-out.log
stderr_logfile = /var/log/supervisor/udisks-glue-err.log


root@raspime:~# ls -al /etc/supervisor/conf.d/
total 16
drwxr-xr-x 2 root root 4096 Dec  6 20:15 .
drwxr-xr-x 3 root root 4096 Dec  6 13:29 ..
-rw-r--r-- 1 root root  209 Dec  6 14:25 udisks-glue.conf

Restart service after create configuration file
root@raspime:~# /etc/init.d/supervisor restart
[ ok ] Restarting supervisor (via systemctl): supervisor.service.

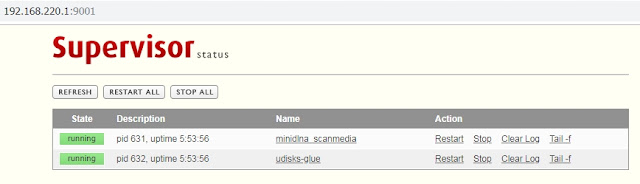
Check if udisk-glue process from supervisor running or not
root@raspime:~# supervisorctl
udisks-glue                      RUNNING   pid 10260, uptime 0:01:45
supervisor>
* Type quit for quit

OR check via web

Wednesday, January 31, 2018

How To Install TWRP-3.0.2.0 on MIUI 9 (Mi Note Marshmallow)

1. First, be sure to have android drivers for your Mi note. You will need it to use fastboot or adb...
  • Personally, I use PDANet driver for windows. plug your device and install it, if it fail, restart your computer using "Disable driver signature enforcement" explained here.
  • Or use Mi PC Suite
2. Don't forget to have USB Debugging in Developer options (you know how to do it )

3. Next, reboot your phone in fastboot (power +volume down pressed).

4. Now, you have to download a special version of TWRP for Mi note  TWRP-3.0.2.0-Virgo (unzip it to get the img file)

5. Next, reboot your phone in fastboot (power +volume down pressed).
  • in fastboot mode. You can do the next step to test if TWRP Image is working, it will boot your device temporary usig TWRP (not installed yet)
Code:
fastboot boot twrp-virgo.img

  • if everything okay, then flash it using fastboot with this command
Code:
fastboot flash recovery twrp-virgo.img

6. Reboot your device wuth this command


Code:
fastboot reboot
If you want to root your device using TWRP, you can read it here

Source : miui forum

How To Root MIUI 9 (Mi Note Marshmallow)

1. First, be sure to have android drivers for your Mi note. You will need it to use fastboot or adb...
  • Personally, I use PDANet driver for windows. plug your device and install it, if it fail, restart your computer using "Disable driver signature enforcement" explained here.
  • Or use Mi PC Suite
2. Don't forget to have USB Debugging in Developer options (you know how to do it )

3. Next, reboot your phone in fastboot (power +volume down pressed).
  • You can also find others mini adb/fastboot like in xda...
4. Now, you have to download the last version of SuperSU, and a special version of TWRP for Mi note :
5. Put the SuperSu zip in your device (/sdcard/ for example, somewhere accessible with twrp)

6. FINALLY, you have all to root your device !
  • I recommend you to put the fastboot/adb mini unzipped in the top of the c: directory, just to be more easier to access, like c:\adb
  • put TWRP img next to adb and fastboot file (like in my example in c:\adb)
  • Run a command promt :
Code:
cd c:\adb device
List of devices attached
57d7493e
  • If you see a number with fastboot like "12345678 fastboot", your smartphone is recognize and in fastboot mode. You can do the next step :
Code:
fastboot boot twrp-virgo.img
7. Your Mi note will reboot with TWRP started (and not installed).
  • Touch "Install" and select the SuperSu zip to flash
  • Swipe to install...
  • For me, it was installed without any error
  • BE ATTENTIVE, for any reason, after installing the zip, twrp will you recommend to install their SuperSu, don't do it !! Don't swipe it !!Select the middle button to ignore it, it's an automated function, which is useless and you will need to re-flash your ROM and re root it... (or worst)
  • reboot your device
  • After reboot, I do not remember but if there is no SuperSu app displayed, just install it from the playstore. Run it. It can ask you to update SuperSu, update it choosing NORMAL mode and Reboot :)
8. Your Mi note is rooted !!

Source : miui forum

Sqlite3 on Android Marshmallow (armv7)

This is only updated info for installing Sqlite3-3.21.0 on Android Marshmallow, you can get binary from here (i got from XDA), For installation instruction you can follow this tutorial.

Wednesday, October 25, 2017

Keepass 2.3.7 Using Dropbox API Version 2.0 (Windows 7 Pro 64 Bit)

A few day ago, suddenly my keepass can't access "my_keepass.kdbx" on dropbox, even if i created new credential wizard through menu "tool --> url credential wizard", i'm still unable to access it.

As we know ( even if you are late to know) Dropbox API Version 1 has been deprecated on 28th September 2017, some application which depending on Dropbox API Version 1 will produce error, and this change has effect on keecloud too.

After sometime googling and read forum on KeeCloud's forum, i found the solution, and yes, it is simple.


  1. First, i'm using Keepass 2.3.7 (Portable Version) on Windows 7 Professional 64 Bit, to fix this issue, you may update your Keepass if you want it. But the most important step is you must revoke keecloud from your dropbox, because new KeeCloud doesn't need username, it just need the credential number from dropbox, do this step inside your dropbox setting. (Personal Setting --> conneccted application --> keecloud), clikc the [X] to remove keecloud from connected application area.
KeeCloud.plgx File 4 MB KeeCloud.zip Zip archive 3 MB

  1. Open your Keepass folder, go to "D:\PortableApps\PortableApps\KeePass\plugins\", remember, i'm using portable version, if you install it, the position will be very different, but even if you are using the same portable version, folder location maybe different too.

  1. Move KeeCloud.plgx to "D:\PortableApps\PortableApps\KeePass\plugins" and replace old file.

  1. Extract KeeCloud.zip until you get KeeCloud folder and move all KeeCloud\* to "D:\PortableApps\PortableApps\KeePass\plugins\dlls\" and replace all old file inside it.

  1. Then open keepass and go to tools --> Url Credential Wizard and follow the instruction on the screen, this step will open Dropbox through default browser on your computer.


  1. Sign in to your dropbox and allow KeeCloud to access your dropbox file.


  1.  After this step, you will get credential code (accessess code).


  1. Copy it and paste into opened windows from credential configuration.


  1. Click Next, you will get passcode for KeeCloud to access Dropbox, copy it to notepad and delete it after finish (don't save it). Open your existing file_keepass.kdbx, using, open URL menu from Keepass.


  1. Insert URL with dropbox://keepass_database_folder/keepass_file.kdbx, and insert passcode from step 10 and click OK


for some reason, if you are still can't connect to your kdbx file at dropbox, you can fill username with email which you are using login to dropbox.


  1. Type your keepass_file.kdbx master password and click OK


  1. Done.


For another Keepass setup in this website, please see this link

Friday, December 02, 2016

Adding Subtitle and Scaling Film using ffmpeg

Linux Version :
# lsb_release -da
Distributor ID: Ubuntu
Description:    Ubuntu 14.04.4 LTS
Release:        14.04
Codename:       trusty

You will need to install :
root@kecap:/tmp# apt-get install ffmpeg
ffmpeg used for adding and scaling film, for another information you can google it.

root@kecap:/tmp# apt-get install fontconfig
because i want use another font for my subtitle, in this case it's Arial

root@kecap:/tmp# apt-get install ttf-mscorefonts-installer
you need to install this package to get microsoft fonts, but if after installing this package and you got empty directory (like what happen to me), simple...just copy arial font from windows to /usr/share/fonts/truetype/msttcorefonts/ and run fs-cache.

Now, we go to main topic.

Adding subtitle using ffmpeg
Basic :
ffmpeg -i input.mp4 -vf subtitles=mysub.srt output.mp4
Advanced :
ffmpeg -i input.mp4 -vf subtitles="f=mysub.srt:force_style='FontName=Arial Bold,FontSize=22,PrimaryColour=&H0009FAFD,OutlineColour=&H00000000,WrapStyle=2,Borderstyle=1,Outline=1,Shadow=1'" -y output.mp4
for .ASS tag description please read this

Scaling film using ffmpeg
Basic :
ffmpeg -i input.mp4 -vf scale=1028:720 output.mp4
Advanced :
ffmpeg -i input.mp4 -vf scale=-1:720 -c:v libx264 -profile:v high -level:v 3.1 -c:a copy output.mp4

Combining two ffmpeg command
ffmpeg -i input.mp4 -vf "scale=-1:720,subtitles="f=mysub.srt:force_style='FontName=Arial Bold,FontSize=22,PrimaryColour=&H0009FAFD,OutlineColour=&H00000000,WrapStyle=2,Borderstyle=1,Outline=1,Shadow=1'"" -c:v libx264 -profile:v high -level:v 3.1 -y output.mp4

ffmpeg & bash
If you writing ffmpeg script inside bash, you will get "funny error"
Parse error, at least 3 arguments were expected, only 1 given in string....
the point is the bash script seems to produce input (Namely the 'c' key) which interferes with the ffmpeg process. just add >/dev/null at the end of the ffmpeg command to prevent ffmpeg from reading its standard input, see example below:
ffmpeg -i input.mp4 -vf scale=1028:720 output.mp4 >/dev/null
for more information you can read it here

Tuesday, October 25, 2016

Increasing Java Heap Memory Size on Openfire 4.0.3 (Slackware 14.0 and Debian 8.5)

Slackware 14.0
Openfire Version : 4.0.3
Installed location : /opt/openfire

increasing java heap memory size
creating openfire.vmoptions
root:# touch /opt/openfire/bin/openfire.vmoptions

and at this value to openfire.vmoptions (mine is max 1GB), change value as needed.
root:# mcedit /opt/openfire/bin/openfire.vmoptions
-Xms512m
-Xmx1024m

Testing

Start openfire and grep it to see if variable inside openfire.vmoptions used or not.

root:# ps ax | grep -i openfire
13488 pts/1    Sl     1:09 /usr/lib/java/bin/java -server -Dinstall4j.jvmDir=/usr/lib/java -Dexe4j.moduleName=/opt/openfire/bin/openfire -DopenfireHome=/opt/openfire/bin/../ -Dopenfire.lib.dir=/opt/openfire/lib -Dinstall4j.launcherId=22 -Dinstall4j.swt=false -Di4jv=0 -Di4jv=0 -Di4jv=0 -Di4jv=0 -Di4jv=0 -Xms512m -Xmx1024m -Di4j.vpt=true -classpath /opt/openfire/.install4j/i4jruntime.jar:/opt/openfire/lib/bcpg-jdk15on.jar:/opt/openfire/lib/bcpkix-jdk15on.jar:/opt/openfire/lib/bcprov-jdk15on.jar:/opt/openfire/lib/hsqldb.jar:/opt/openfire/lib/javax.websocket-api.jar:/opt/openfire/lib/jtds.jar:/opt/openfire/lib/mail.jar:/opt/openfire/lib/mysql.jar:/opt/openfire/lib/npn-boot.jar:/opt/openfire/lib/openfire.jar:/opt/openfire/lib/postgres.jar:/opt/openfire/lib/slf4j-log4j12.jar:/opt/openfire/lib/startup.jar com.install4j.runtime.launcher.UnixLauncher start e44106de /opt/openfire/bin/../logs/stderror.log /opt/openfire/bin/../logs/stdoutt.log org.jivesoftware.openfire.starter.ServerStarter
16615 pts/1    S+     0:00 grep -i openfire
See -Xms512m -Xmx1024m inside grep command

Debian 8.5
Openfire Version : 4.0.3
Installed location : /usr/share/openfire

root@triton:/var/lib# cat /etc/default/openfire
# Defaults for openfire initscript
# sourced by /etc/init.d/openfire
# installed at /etc/default/openfire by the maintainer scripts

#
# This is a POSIX shell fragment
#

# If you wish to override the auto-detected JAVA_HOME variable, uncomment
# and change the following line.
#JAVA_HOME=/usr/java/default

# Additional options that are passed to the Daemon.
DAEMON_OPTS=""

change to

root@triton:/var/lib# cat /etc/default/openfire
# Defaults for openfire initscript
# sourced by /etc/init.d/openfire
# installed at /etc/default/openfire by the maintainer scripts

#
# This is a POSIX shell fragment
#

# If you wish to override the auto-detected JAVA_HOME variable, uncomment
# and change the following line.
#JAVA_HOME=/usr/java/default

# Additional options that are passed to the Daemon.
# DAEMON_OPTS=""

DAEMON_OPTS="-Xms512m -Xmx1024

Testing

root@triton:/etc/default# ps -ax | grep -i openfire
26071 ?        Sl     0:06 /usr/lib/jvm/java-7-openjdk-amd64/jre/bin/java -Xms512m -Xmx1024m -server -DopenfireHome=/usr/share/openfire -Dopenfire.lib.dir=/usr/share/openfire/lib -classpath /usr/share/openfire/lib/startup.jar -jar /usr/share/openfire/lib/startup.jar  
See -Xms512m -Xmx1024m inside grep command

Before

Before increasing Java Memory to 1GB

After increasing Java Memory to 1GB


Openfire RSA Certificate issue (RSA certificate not valid)

I got this error after moving my openfire database from Slackware 14.0 to Debian 8.5,

but it just simple problem and openfire already have this solution, just follow this step to resolve issue. Now open TLS/SSL Crtificates tab, and Delete ALL certificates there.


Now you should get new certificates


And everything back to normal


Moving Openfire 4.0.3 Embedded Database from Slackware 14.0 to Debian 8.5

Slackware 14.0

embedded-db location is at  /opt/openfire/embedded-db/ that because im installing Openfire at directory /opt

root:# ls -al /opt/openfire/embedded-db/
total 172672
drwxr-xr-x  2 root root      4096 Oct 24 13:26 ./
drwxr-xr-x 12 root root      4096 Sep  5 09:52 ../
-rw-r--r--  1 root root        16 Oct 24 13:35 openfire.lck
-rw-r--r--  1 root root   4236557 Oct 24 13:35 openfire.log
-rw-r--r--  1 root root       410 Oct 24 13:26 openfire.properties
-rw-r--r--  1 root root 172378422 Oct 24 13:26 openfire.script

Basicly embedded openfire database is only script, yes it just one script contains many SQL command, and that script is openfire.script inside directory embedded-db.

Okay, before we doing backup for directory embedded-db, we must stop openfire service.
root:# /etc/rc.d/rc.openfire stop

Then zip it using zip tool
root:# zip -r embedded-db.slackware.zip embedded-db/
updating: embedded-db/ (stored 0%)
  adding: embedded-db/openfire.properties (deflated 42%)
  adding: embedded-db/openfire.script (deflated 89%)
  adding: embedded-db/openfire.lck (stored 0%)

And you will get embedded-db.slackware.zip (you can use another name) and copy embedded-db.slackware.zip  to Debian 8.5.


Debian 8.5 
embedded-db location is at /usr/share/openfire/ but linked to /var/lib/openfire/embedded-db/

root@triton:~# ls -al /var/lib/openfire/embedded-db/
total 21104
drwxr-x--- 2 openfire openfire     4096 Oct 23 08:20 .
drwxr-x--- 5 openfire openfire     4096 Sep 28 12:54 ..
-rw-r--r-- 1 openfire openfire       16 Oct 23 08:48 openfire.lck
-rw-r--r-- 1 openfire openfire 12878456 Oct 23 08:48 openfire.log
-rw-r--r-- 1 openfire openfire      410 Oct 23 08:20 openfire.properties
-rw-r--r-- 1 openfire openfire  8706332 Oct 23 08:20 openfire.script

Okay, before we doing backup for directory embedded-db, we must stop openfire service.
root@triton:# /etc/init.d/openfire stop

Then zip it using zip tool
root@triton:/var/lib/openfire# zip -r embedded-db.debian.zip embedded-db
  adding: embedded-db/ (stored 0%)
  adding: embedded-db/openfire.properties (deflated 43%)
  adding: embedded-db/openfire.script (deflated 58%)

Delete directory embedded-db
root@triton:/var/lib/openfire# rm -Rf embedded-db

root@triton:/var/lib/openfire# ls -al
total 22484
drwxr-x---  4 openfire openfire     4096 Oct 23 09:05 .
drwxr-xr-x 57 root     root         4096 Sep  7 22:24 ..
-rw-r--r--  1 root     root     19350774 Oct 24  2016 embedded-db.slackware.zip
-rw-r--r--  1 root     root      3652635 Oct 23 09:03 embedded-db.debian.zip
drwxr-xr-x  3 openfire openfire     4096 Sep 28 12:54 .java
drwxr-x--- 18 openfire openfire     4096 Sep  8 00:07 plugins

Now unzip embedded-db.slackware.zip
root@triton:# unzip embedded-db.slackware.zip

make it become openfire owner with this command
root@triton:/var/lib/openfire# chown openfire:openfire embedded-db -R

Start debian openfire with this command
root@triton:# /etc/init.d/openfire start


open your openfire server at : http://your.openfire.url:9090 and change this value
server --> server manager --> system properties -->xmpp.domain
server --> server manager --> system information-->edit properties (button - left bottom) --> server name

After moving database from one server to another server maybe you will get RSA Certificate issue (RSA certificate not valid), follow this step to resolve it.

Saturday, July 30, 2016

How to Backup and Restore PostgreSQL 9.5.1 Database

Change your current user to postgres
root@ubuntu:~# su postgres
postgres@ubuntu:/root$ cd /tmp/

Listing all database inside postgresql
postgres@ubuntu:/tmp$ psql -l
List of databases
Name    |  Owner   | Encoding |   Collate   |    Ctype    |   Access privileges
-----------+----------+----------+-------------+-------------+-----------------------
newdes    | postgres | UTF8     | en_US.UTF-8 | en_US.UTF-8 |
postgres  | postgres | UTF8     | en_US.UTF-8 | en_US.UTF-8 |
template0 | postgres | UTF8     | en_US.UTF-8 | en_US.UTF-8 | =c/postgres          +
|          |          |             |             | postgres=CTc/postgres
template1 | postgres | UTF8     | en_US.UTF-8 | en_US.UTF-8 | postgres=CTc/postgres+
|          |          |             |             | =c/postgres
(4 rows)

Backing up single database (using pg_dump not pg_dumpall)


For your info, you can't restore plain backup using pg_restore, but you must using psql tool, for more information about this, you can read this.

Plain Backup (text file)
you can open this backup using text editor, like vi, nano, mcedit, pico, etc.
postgres@ubuntu:/tmp$ pg_dump newdes > /tmp/newdes_30072016.sql

Compressed binary format
postgres@ubuntu:/tmp$ pg_dump -Fc newdes > /tmp/newdes_30072016.bak

Tarball file
can restoring using pgadmin
postgres@ubuntu:/tmp$ pg_dump -Ft newdes > /tmp/newdes_30072016.tar

postgres@ubuntu:/tmp$ ls -al /tmp/
total 10592
drwxrwxrwt  3 www-data users      20480 Jul 30 10:08 .
drwxr-xr-x 22 root     root        4096 Jul 20 16:19 ..
-rwxrw-rw-  1 root     kraken   6059213 Jul 30 08:12 kraken.backup
drwx------  2 root     root        4096 Jul 30 09:56 mc-root
-rw-rw-r--  1 postgres postgres  465051 Jul 30 10:08 newdes_30072016.bak
-rw-rw-r--  1 postgres postgres 2112274 Jul 30 10:08 newdes_30072016.sql
-rw-rw-r--  1 postgres postgres 2174464 Jul 30 10:08 newdes_30072016.tar


Restoring backup database

postgres@ubuntu:/tmp$ psql --version
psql (PostgreSQL) 9.5.1

Create empty database
From root user (or another user)
root@ubuntu:~# createdb -h localhost -p 5432 -U postgres newdes
Password: ****

Or from postgres user
root@ubuntu:~# su postgres
postgres@ubuntu:/tmp$ psql -l
postgres@ubuntu:/tmp$ createdb newdes;

Listing all database inside postgresql
postgres@ubuntu:/tmp$ psql -l
                                  List of databases
   Name    |  Owner   | Encoding |   Collate   |    Ctype    |   Access privileges
-----------+----------+----------+-------------+-------------+-----------------------
 newdes    | postgres | UTF8     | en_US.UTF-8 | en_US.UTF-8 |
 postgres  | postgres | UTF8     | en_US.UTF-8 | en_US.UTF-8 |
 template0 | postgres | UTF8     | en_US.UTF-8 | en_US.UTF-8 | =c/postgres          +
           |          |          |             |             | postgres=CTc/postgres
 template1 | postgres | UTF8     | en_US.UTF-8 | en_US.UTF-8 | postgres=CTc/postgres+
           |          |          |             |             | =c/postgres
(4 rows)


Restoring Plain backup (database already exist)

Alternative command 1
postgres@ubuntu:/tmp$ createdb newdes;
postgres@ubuntu:/tmp$ psql newdes -f newdes_30072016.sql
SET
SET
SET
SET
SET
SET
SET
CREATE SCHEMA
ALTER SCHEMA
CREATE SCHEMA
ALTER SCHEMA
CREATE SCHEMA
ALTER SCHEMA
----

Alternative command 2
postgres@ubuntu:/tmp$ createdb newdes;
postgres@ubuntu:/tmp$ psql -f newdes_30072016.sql template1
SET
SET
SET
SET
SET
SET
SET
CREATE SCHEMA
ALTER SCHEMA
CREATE SCHEMA
ALTER SCHEMA
CREATE SCHEMA
ALTER SCHEMA
----

Alternative command 3
postgres@ubuntu:/tmp$ createdb newdes;
postgres@ubuntu:/tmp$ psql -U postgres < newdes_30072016.sql
SET
SET
SET
SET
SET
SET
SET
CREATE SCHEMA
ALTER SCHEMA
CREATE SCHEMA
ALTER SCHEMA
CREATE SCHEMA
ALTER SCHEMA
----

Alternative command 4
postgres@ubuntu:/tmp$ createdb newdes;
postgres@ubuntu:/tmp$ psql -f newdes_30072016.sql postgres
SET
SET
SET
SET
SET
SET
SET
CREATE SCHEMA
ALTER SCHEMA
CREATE SCHEMA
ALTER SCHEMA
CREATE SCHEMA
ALTER SCHEMA
----


Restoring compressed binary format
pg_restore -Fc newdes_30072016.bak

Restoring tarball file
pg_restore -Ft newdes_30072016.tar


Restoring Plain backup (database NOT exist)

Restoring compressed binary format
pg_restore -Fc -C newdes_30072016.bak

Restoring tarball file
pg_restore -Ft -C newdes_30072016.tar

How to Backup and Restore PostgreSQL 9.5.1 Database

Change your current user to postgres
root@ubuntu:~# su postgres
postgres@ubuntu:/root$ cd /tmp/

Listing all database inside postgresql
postgres@ubuntu:/tmp$ psql -l
List of databases
Name    |  Owner   | Encoding |   Collate   |    Ctype    |   Access privileges
-----------+----------+----------+-------------+-------------+-----------------------
newdes    | postgres | UTF8     | en_US.UTF-8 | en_US.UTF-8 |
postgres  | postgres | UTF8     | en_US.UTF-8 | en_US.UTF-8 |
template0 | postgres | UTF8     | en_US.UTF-8 | en_US.UTF-8 | =c/postgres          +
|          |          |             |             | postgres=CTc/postgres
template1 | postgres | UTF8     | en_US.UTF-8 | en_US.UTF-8 | postgres=CTc/postgres+
|          |          |             |             | =c/postgres
(4 rows)

Backing up single database (using pg_dump not pg_dumpall)


For your info, you can't restore plain backup using pg_restore, but you must using psql tool, for more information about this, you can read this.

Plain Backup (text file)
you can open this backup using text editor, like vi, nano, mcedit, pico, etc.
postgres@ubuntu:/tmp$ pg_dump newdes > /tmp/newdes_30072016.sql

Compressed binary format
postgres@ubuntu:/tmp$ pg_dump -Fc newdes > /tmp/newdes_30072016.bak

Tarball file
can restoring using pgadmin
postgres@ubuntu:/tmp$ pg_dump -Ft newdes > /tmp/newdes_30072016.tar

postgres@ubuntu:/tmp$ ls -al /tmp/
total 10592
drwxrwxrwt  3 www-data users      20480 Jul 30 10:08 .
drwxr-xr-x 22 root     root        4096 Jul 20 16:19 ..
-rwxrw-rw-  1 root     kraken   6059213 Jul 30 08:12 kraken.backup
drwx------  2 root     root        4096 Jul 30 09:56 mc-root
-rw-rw-r--  1 postgres postgres  465051 Jul 30 10:08 newdes_30072016.bak
-rw-rw-r--  1 postgres postgres 2112274 Jul 30 10:08 newdes_30072016.sql
-rw-rw-r--  1 postgres postgres 2174464 Jul 30 10:08 newdes_30072016.tar


Restoring backup database

postgres@ubuntu:/tmp$ psql --version
psql (PostgreSQL) 9.5.1

Create empty database
From root user (or another user)
root@ubuntu:~# createdb -h localhost -p 5432 -U postgres newdes
Password: ****

Or from postgres user
root@ubuntu:~# su postgres
postgres@ubuntu:/tmp$ psql -l
postgres@ubuntu:/tmp$ createdb newdes;

Listing all database inside postgresql
postgres@ubuntu:/tmp$ psql -l
                                  List of databases
   Name    |  Owner   | Encoding |   Collate   |    Ctype    |   Access privileges
-----------+----------+----------+-------------+-------------+-----------------------
 newdes    | postgres | UTF8     | en_US.UTF-8 | en_US.UTF-8 |
 postgres  | postgres | UTF8     | en_US.UTF-8 | en_US.UTF-8 |
 template0 | postgres | UTF8     | en_US.UTF-8 | en_US.UTF-8 | =c/postgres          +
           |          |          |             |             | postgres=CTc/postgres
 template1 | postgres | UTF8     | en_US.UTF-8 | en_US.UTF-8 | postgres=CTc/postgres+
           |          |          |             |             | =c/postgres
(4 rows)


Restoring Plain backup (empty database already exist)

Alternative command 1
postgres@ubuntu:/tmp$ createdb newdes;
postgres@ubuntu:/tmp$ psql newdes -f newdes_30072016.sql
SET
SET
SET
SET
SET
SET
SET
CREATE SCHEMA
ALTER SCHEMA
CREATE SCHEMA
ALTER SCHEMA
CREATE SCHEMA
ALTER SCHEMA
----

Alternative command 2
postgres@ubuntu:/tmp$ createdb newdes;
postgres@ubuntu:/tmp$ psql -f newdes_30072016.sql template1
SET
SET
SET
SET
SET
SET
SET
CREATE SCHEMA
ALTER SCHEMA
CREATE SCHEMA
ALTER SCHEMA
CREATE SCHEMA
ALTER SCHEMA
----

Alternative command 3
postgres@ubuntu:/tmp$ createdb newdes;
postgres@ubuntu:/tmp$ psql -U postgres < newdes_30072016.sql
SET
SET
SET
SET
SET
SET
SET
CREATE SCHEMA
ALTER SCHEMA
CREATE SCHEMA
ALTER SCHEMA
CREATE SCHEMA
ALTER SCHEMA
----

Alternative command 4
postgres@ubuntu:/tmp$ createdb newdes;
postgres@ubuntu:/tmp$ psql -f newdes_30072016.sql postgres
SET
SET
SET
SET
SET
SET
SET
CREATE SCHEMA
ALTER SCHEMA
CREATE SCHEMA
ALTER SCHEMA
CREATE SCHEMA
ALTER SCHEMA
----


Restoring compressed binary format
pg_restore -Fc newdes_30072016.bak

Restoring tarball file
pg_restore -Ft newdes_30072016.tar


Restoring Plain backup (database NOT exist)

Restoring compressed binary format
pg_restore -Fc -C newdes_30072016.bak

Restoring tarball file
pg_restore -Ft -C newdes_30072016.tar

Wednesday, June 29, 2016

Adding SQLite3 Binary on ROOTED Android (Advanced Mode)

Download SQLite3 binary from here, if you want another source to install SQLite3 with more simple step, then you may follow this instructions.

Info :
My android ip : 192.168.100.6
Downloaded sqlite3 binary location : /sdcard/Download/

1. In this step i'm using WIFI ADB (install it from Google Playstore).
2. install latest adb from here or here
3. start connect to your android device using adb command:
D:\tmp\adb connect 192.168.100.6:5555
* daemon not running. starting it now on port 5037 *
* daemon started successfully *
connected to 192.168.100.6:5555

go to android shell
D:\tmp\adb shell

Become root
shell@android:/ $ su

mount system to allow read and write
root@android:/ # mount -o remount,rw /system

go to your place where you save sqlite3 binary, in this case i'm saving at sdcard/Download/
root@android:/ # cd sdcard/Download/
root@android:/ # ls sqlite3
sqlite3

copy sqlite3 binary into your /system/xbin/
root@android:/sdcard/Download # cp sqlite3 /system/xbin/
root@android:/sdcard/Download # ls -al /system/xbin/sqlite3
----rwxr-x root     root       868952 2016-06-29 11:26 sqlite3

make your sqlite3 binary become executable
root@android:/sdcard/Download # chmod 755 /system/xbin/sqlite3

Now lets mount back /system/ as read only (ro)
root@android:/ # mount -o remount,ro /system

Now run your sqlite3 from command shell, and try to query database inside your android
root@android:/storage/sdcard0 # sqlite3 /data/data/jp.naver.line.android/databases/naver_line
SQLite version 3.8.11.1 2015-07-29 20:00:57
Enter ".help" for usage hints.
sqlite> .tables
android_metadata       group_home             sns_friends
chat                   groups                 sticker
chat_history           membership             sticker_package
chat_member            more_menu_item_status  sticon_packages
chat_notification      my_theme               sticons
contacts               permanent_tasks        version
email_recommend        product
esk_history            setting
sqlite> SELECT * FROM setting;
AU_SMART_PASS_AGREEMENT|1
AU_SMART_PASS_FUNC_ACTIVATE|1
CHANNEL_ENCRYPTED|1
USER_STATUS_ACCESS_MOBILE_NETWORK_TIMESTAMP|1467159063483
APP_CURRENT_VERSION|15060403_6.4.1
APP_INIT|true
USER_STATUS_LAST_FOREGROUND_TIMESTAMP|1467164323745
MAT_INITIALIZED|1
APP_TIMELINE_TAB_BADGECOUNT|0
...
sqlite>

Done

Adding SQLite3 Binary on ROOTED Android (Simple Mode)

Some devices come with luxury binary, but some lacking that luxury item, but as we are love to hack android it doesn't matter anymore, in this little post, i will show you how to insert SQLite3 binary into our system.

Okay, now follow the instructions below, if you like using adb command then you can read advanced mode.

1. Download SQLite3 binary from here or here or here
2. Install any File manager with ROOT Capability like Root Explorer or Root Browser
3. Copy SQLite3 binary into /system/xbin/sqlite3
4. Chmod 0755 /system/xbin/sqlite3, you can do this inside Root Explorer or Root Browser


5. Done

Example shell output from sqlite3
root@android:/storage/sdcard0 # sqlite3 --help
Usage: sqlite3 [OPTIONS] FILENAME [SQL]
FILENAME is the name of an SQLite database. A new database is created
if the file does not previously exist.
OPTIONS include:
   -ascii               set output mode to 'ascii'
   -bail                stop after hitting an error
   -batch               force batch I/O
   -column              set output mode to 'column'
   -cmd COMMAND         run "COMMAND" before reading stdin
   -csv                 set output mode to 'csv'
   -echo                print commands before execution
   -init FILENAME       read/process named file
   -[no]header          turn headers on or off
   -help                show this message
   -html                set output mode to HTML
   -interactive         force interactive I/O
   -line                set output mode to 'line'
   -list                set output mode to 'list'
   -lookaside SIZE N    use N entries of SZ bytes for lookaside memory
   -mmap N              default mmap size set to N
   -newline SEP         set output row separator. Default: '\n'
   -nullvalue TEXT      set text string for NULL values. Default ''
   -pagecache SIZE N    use N slots of SZ bytes each for page cache memory
   -scratch SIZE N      use N slots of SZ bytes each for scratch memory
   -separator SEP       set output column separator. Default: '|'
   -stats               print memory stats before each finalize
   -version             show SQLite version
   -vfs NAME            use NAME as the default VFS
1|root@android:/storage/sdcard0 # sqlite3 -version
3.8.11.1 2015-07-29 20:00:57 cf538e2783e468bbc25e7cb2a9ee64d3e0e80b2f

Another source for SQLite3 you may interesting:
sqlite3-android
sqlite3
forum.xda-developers

Wednesday, September 16, 2015

Raspberry Pi 2 Model B–Adding Use 2.5″ Hard Drive - Hitachi Touro 1Tb USB 3.0


If you have a small portable 2.5″ hard drive that draws power from the USB port, you can make this work without the need for an external power supply with the Raspberry Pi. You will be modifying how the GPIO pins on the Pi work, specifically turning pin 38 on (represented by 1). 

This means you can double the current over the USB bus from 600mA to 1200mA so you can actually power external USB devices through the Raspberry Pi itself.
Update to latest firmware:
root@raspime:/# sudo rpi-update
Edit /boot/config.txt
root@raspime:/# nano /boot/config.txt
add this line to the /boot/config.txt
max_usb_current=1Reboot
VerifyCheck gpio38, value should be '1'
sudo bash
root@raspime:/# cd  /sys/class/gpio
root@raspime:/# echo 38 > /sys/class/gpio/export
root@raspime:/# cat /sys/class/gpio/gpio38/value
1
OR
Using the wiringPi gpio command, you can do the following:
To make sure everything in default conditions
gpio -g write 38 0
gpio -g mode 38 out
To increase the limit to 1.2A:
gpio -g write 38 1
Verify
root@raspime:/# gpio -v
gpio version: 2.26
Copyright (c) 2012-2015 Gordon Henderson
This is free software with ABSOLUTELY NO WARRANTY.
For details type: gpio -warranty
Raspberry Pi Details:
  Type: Model 2, Revision: 1.1, Memory: 1024MB, Maker: Sony
Check gpio38, value should be '1'
root@raspime:/# gpio -g read 38
1

Raspberry Pi 2 Model B First Setup


Here is my Raspberry Pi 2 Specification :
The Raspberry Pi 2 Model B is the second generation Raspberry Pi. It replaced the original Raspberry Pi 1 Model B+ in February 2015. Compared to the Raspberry Pi 1 it has: A 900MHz quad-core ARM Cortex-A7 CPU, 1GB RAM.
Like the (Pi 1) Model B+, it also has:
  • 4 USB ports
  • 40 GPIO pins
  • Full HDMI port
  • Ethernet port
  • Combined 3.5mm audio jack and composite video
  • Camera interface (CSI)
  • Display interface (DSI)
  • Micro SD card slot
  • VideoCore IV 3D graphics core
I’m using Minibian Wheezy-18022015 from here
The main features of last version (2015-02-18) included in MINIBIAN image are:
  • Kernel 3.18.7+ #755
  • 13 secs boot (on RPi 2)
  • 24 MB RAM used
  • 334 MB disk space used
  • Fit on 512MB SD Card
  • Optimized ext4 file system with swap disabled
  • Support for RPi B, RPi B+ and the new RPi 2
  • Targeted for embedded or server applications (NAS, Web server, electronic applications)
  • 100% full compatbile with officiale release
  • DHCP client enabled
  • SSHD enabled
  • root user enabled (default password: raspberry – please change it a.s.a.p.)
For storage, I’m using 4GB MicroSD Card (Visipro Class 6)
root@raspime:~# fdisk -l
Disk /dev/mmcblk0: 3997 MB, 3997171712 bytes
4 heads, 16 sectors/track, 121984 cylinders, total 7806976 sectors
Units = sectors of 1 * 512 = 512 bytes
Sector size (logical/physical): 512 bytes / 512 bytes
I/O size (minimum/optimal): 512 bytes / 512 bytes
Disk identifier: 0x0004a452
        Device Boot      Start         End      Blocks   Id  System
/dev/mmcblk0p1              16       97727       48856    b  W95 FAT32
/dev/mmcblk0p2           97728     7806975     3854624   83  Linux
Oke, Next step we are going to “copying” Minibian image (Minibian.img) to Sdcard, please follow step bellow.
  • Download Minibian Wheezy-18022015 from here.
  • Get SD Formatter from here it’s available for Windows and Mac.
  • Get Win32DiskImager from here it’s only available for Windows user, foe Linux user you can use DD tools.
  • Install and then open SD Formatter to format your MicroSDCard, when you are done, go to the next step.
  • Install and then open Win32DiskImager then choose Minibian.img  for Image File and for Device choose your Micro SDCard Drive.
Win32DiskImager
  • When you ready, press Write button and wait it till finish.
  • Done, plug that MicroSDCard to Raspi and boot it.