Showing posts with label Linux. Show all posts

Tuesday, December 11, 2018

MINIDLNA - AUTO SCAN WHEN USB DISK INSERTED

READ THIS BEFORE CONTINUE

#
#*******************************************************************************
# RASPBERRY PI 2 MODEL B ON DEBIAN STRETCH 9.6
#*******************************************************************************
#
# /etc/os-release
#
root@raspime:~# cat /etc/os-release
PRETTY_NAME="Raspbian GNU/Linux 9 (stretch)"
NAME="Raspbian GNU/Linux"
VERSION_ID="9"
VERSION="9 (stretch)"
ID=raspbian
ID_LIKE=debian
HOME_URL="http://www.raspbian.org/"
SUPPORT_URL="http://www.raspbian.org/RaspbianForums"
BUG_REPORT_URL="http://www.raspbian.org/RaspbianBugs"

Instal needed package using this command
root@raspime:~# apt-get install udisks-glue policykit-1 supervisor

#
#*******************************************************************************
# MINIDLNA CONFIGURATION
#*******************************************************************************
#
# /etc/minidlna.conf
#
root@raspime:~# cat /etc/minidlna.conf

media_dir=V,/media/minidlna/MOVIES
media_dir=A,/media/minidlna/MUSICS
media_dir=P,/media/minidlna/PICTURES

friendly_name=Raspime Media Server
inotify=yes
notify_interval=30
db_dir=/var/cache/minidlna
log_dir=/var/log
log_level=warn


Check minidlna version
root@raspime:~# apt show minidlna

Package: minidlna
Version: 1.2.1-1
Status: install ok installed
Priority: extra
Section: checkinstall
Maintainer: diantokam@raspime
Installed-Size: 598 kB
Provides: minidlna
Download-Size: unknown
APT-Manual-Installed: yes
APT-Sources: /var/lib/dpkg/status
Description: MiniDLNA Version 1.2.1 Compiled December 4, 2018
Compiled for Debian 9.6 by  diantokam.blogspot.com


root@raspime:~# minidlnad -V

Version 1.2.1

#
# /etc/init.d/minidlna status
#
root@raspime:~# /etc/init.d/minidlna status

minidlna.service - LSB: minidlna server
Loaded: loaded (/etc/init.d/minidlna; generated; vendor preset: enabled)
Active: active (exited) since Thu 2018-12-06 20:00:02 WIB; 6min ago
Docs: man:systemd-sysv-generator(8)
Process: 7385 ExecStop=/etc/init.d/minidlna stop (code=exited, status=0/SUCCESS)
Process: 7395 ExecStart=/etc/init.d/minidlna start (code=exited, status=0/SUCCESS)

Dec 06 20:00:02 raspime systemd[1]: Started LSB: minidlna server.

#*******************************************************************************
# SUPERVISOR
#*******************************************************************************

root@raspime:~# cat /etc/supervisor/conf.d/minidlna_scanmedia.conf

[program:minidlna_scanmedia]
command=/usr/local/bin/minidlna_scanmedia.sh
autostart=true
autorestart=true
stdout_logfile=/var/log/supervisor/minidlna_scanmedia-out.log
stderr_logfile=/var/log/supervisor/minidlna_scanmedia-err.log


root@raspime:~# /etc/init.d/supervisor restart

[ ok ] Restarting supervisor (via systemctl): supervisor.service.


root@raspime:~# supervisorctl

minidlna_scanmedia               RUNNING   pid 10259, uptime 0:01:45
udisks-glue                      RUNNING   pid 10260, uptime 0:01:45

supervisor>

* Type quit for quit

#*******************************************************************************
# MINIDLNA_SCANMEDIA.SH
#*******************************************************************************
#
# /usr/local/bin/minidlna_scanmedia.sh
#
root@raspime:~# cat /usr/local/bin/minidlna_scanmedia.sh

#!/bin/bash
# Created by diantokam.blogspot.com
# December 8, 2018
# This script will runing continuous to check if any
# flashdisk mounted on /media/ by checking log from
# udisk-glue fromsupervisord


while :
do
cat /var/log/supervisor/udisks-glue-out.log | grep -v "BOOTLOADER" | grep media | grep Successfully
cat /var/log/supervisor/udisks-glue-out.log | grep media | grep Successfully
        if [ $? -eq 0 ]
                then
                echo `date`
                echo "mounted media successfully and minidlna will force-reload"
                sleep 10

                service minidlna force-reload
                sleep 5
                echo "" >/var/log/supervisor/udisks-glue-out.log
                break
        fi
                #echo "scan terus gan"
sleep 3
done


WHEN USB FLASHDISK INSERTED AND MOUNTED BY UDISK-GLUE

Supervisord continously run minidlna_scanmedia.sh until it recognize there is usb disk mounted on /media/SLAX9.4, it will run "service minidlna force-reload" and then clear "/var/log/supervisor/udisks-glue-out.log" so it becomes empty

#*******************************************************************************
#ACTION !
#*******************************************************************************
root@raspime:~# mount | grep media

/dev/sdb1 on /media/SLAX9.4 type fuseblk (rw,nosuid,nodev,noatime,sync,user_id=0,group_id=0,default_permissions,allow_other,blksize=4096,uhelper=udisks)


root@raspime:~# cat /var/log/supervisor/minidlna_scanmedia-out.log

Successfully automounted /dev/sdb1 at /media/SLAX9.4
Thu 6 Dec 20:31:43 WIB 2018
mounted media successfully and minidlna will force-reload

The script will then clear udisks-glue-out log

root@raspime:~# cat /var/log/supervisor/udisks-glue-out.log
** EMPTY **

Configure automount for usb drives using UDISK-GLUE and SUPERVISOR

#
#*******************************************************************************
# RASPBERRY PI 2 MODEL B ON DEBIAN STRETCH 9.6
#*******************************************************************************
#
# /etc/os-release
#
root@raspime:~# cat /etc/os-release
PRETTY_NAME="Raspbian GNU/Linux 9 (stretch)"
NAME="Raspbian GNU/Linux"
VERSION_ID="9"
VERSION="9 (stretch)"
ID=raspbian
ID_LIKE=debian
HOME_URL="http://www.raspbian.org/"
SUPPORT_URL="http://www.raspbian.org/RaspbianForums"
BUG_REPORT_URL="http://www.raspbian.org/RaspbianBugs"
root@raspime:~# apt-get install udisks-glue policykit-1 supervisor


#
#*******************************************************************************
# UDISK-GLUE
#*******************************************************************************
#
# /etc/udisks-glue.conf
#
root@raspime:~# cat /etc/udisks-glue.conf
filter disks {
    optical = false
    partition_table = false
    usage = filesystem
}

match disks {
           automount = true
          # For NTFS mount with read and write
           automount_options = { sync, noatime, 'dmask=0000', 'fmask=0000', 'umask=0000' }
           post_mount_command = "mount-notify mounted %device_file %mount_point"
           post_unmount_command = "mount-notify unmounted %device_file %mount_point"
}


#
#*******************************************************************************
# SUPERVISOR
#*******************************************************************************
#
# /etc/supervisor/supervisord.conf
#
root@raspime:~# cat /etc/supervisor/supervisord.conf
[unix_http_server]

[supervisord]

[rpcinterface:supervisor]
supervisor.rpcinterface_factory = supervisor.rpcinterface:make_main_rpcinterface

[supervisorctl]

[include]
files = /etc/supervisor/conf.d/*.conf
[inet_http_server]

# For web accesses
port=*:9001
username=admin
password=admin

#
# /etc/supervisor/conf.d/udisks-glue.conf
#
root@raspime:~# cat /etc/supervisor/conf.d/udisks-glue.conf
[program:udisks-glue]
user = root
command = udisks-glue -f
autostart = true
autorestart = true
stdout_logfile = /var/log/supervisor/udisks-glue-out.log
stderr_logfile = /var/log/supervisor/udisks-glue-err.log


root@raspime:~# ls -al /etc/supervisor/conf.d/
total 16
drwxr-xr-x 2 root root 4096 Dec  6 20:15 .
drwxr-xr-x 3 root root 4096 Dec  6 13:29 ..
-rw-r--r-- 1 root root  209 Dec  6 14:25 udisks-glue.conf

Restart service after create configuration file
root@raspime:~# /etc/init.d/supervisor restart
[ ok ] Restarting supervisor (via systemctl): supervisor.service.

Check if udisk-glue process from supervisor running or not
root@raspime:~# supervisorctl
udisks-glue                      RUNNING   pid 10260, uptime 0:01:45
supervisor>
* Type quit for quit

OR check via web

Wednesday, October 25, 2017

Keepass 2.3.7 Using Dropbox API Version 2.0 (Windows 7 Pro 64 Bit)

A few day ago, suddenly my keepass can't access "my_keepass.kdbx" on dropbox, even if i created new credential wizard through menu "tool --> url credential wizard", i'm still unable to access it.

As we know ( even if you are late to know) Dropbox API Version 1 has been deprecated on 28th September 2017, some application which depending on Dropbox API Version 1 will produce error, and this change has effect on keecloud too.

After sometime googling and read forum on KeeCloud's forum, i found the solution, and yes, it is simple.


  1. First, i'm using Keepass 2.3.7 (Portable Version) on Windows 7 Professional 64 Bit, to fix this issue, you may update your Keepass if you want it. But the most important step is you must revoke keecloud from your dropbox, because new KeeCloud doesn't need username, it just need the credential number from dropbox, do this step inside your dropbox setting. (Personal Setting --> conneccted application --> keecloud), clikc the [X] to remove keecloud from connected application area.
KeeCloud.plgx File 4 MB KeeCloud.zip Zip archive 3 MB

  1. Open your Keepass folder, go to "D:\PortableApps\PortableApps\KeePass\plugins\", remember, i'm using portable version, if you install it, the position will be very different, but even if you are using the same portable version, folder location maybe different too.

  1. Move KeeCloud.plgx to "D:\PortableApps\PortableApps\KeePass\plugins" and replace old file.

  1. Extract KeeCloud.zip until you get KeeCloud folder and move all KeeCloud\* to "D:\PortableApps\PortableApps\KeePass\plugins\dlls\" and replace all old file inside it.

  1. Then open keepass and go to tools --> Url Credential Wizard and follow the instruction on the screen, this step will open Dropbox through default browser on your computer.


  1. Sign in to your dropbox and allow KeeCloud to access your dropbox file.


  1.  After this step, you will get credential code (accessess code).


  1. Copy it and paste into opened windows from credential configuration.


  1. Click Next, you will get passcode for KeeCloud to access Dropbox, copy it to notepad and delete it after finish (don't save it). Open your existing file_keepass.kdbx, using, open URL menu from Keepass.


  1. Insert URL with dropbox://keepass_database_folder/keepass_file.kdbx, and insert passcode from step 10 and click OK


for some reason, if you are still can't connect to your kdbx file at dropbox, you can fill username with email which you are using login to dropbox.


  1. Type your keepass_file.kdbx master password and click OK


  1. Done.


For another Keepass setup in this website, please see this link

Friday, December 02, 2016

Adding Subtitle and Scaling Film using ffmpeg

Linux Version :
# lsb_release -da
Distributor ID: Ubuntu
Description:    Ubuntu 14.04.4 LTS
Release:        14.04
Codename:       trusty

You will need to install :
root@kecap:/tmp# apt-get install ffmpeg
ffmpeg used for adding and scaling film, for another information you can google it.

root@kecap:/tmp# apt-get install fontconfig
because i want use another font for my subtitle, in this case it's Arial

root@kecap:/tmp# apt-get install ttf-mscorefonts-installer
you need to install this package to get microsoft fonts, but if after installing this package and you got empty directory (like what happen to me), simple...just copy arial font from windows to /usr/share/fonts/truetype/msttcorefonts/ and run fs-cache.

Now, we go to main topic.

Adding subtitle using ffmpeg
Basic :
ffmpeg -i input.mp4 -vf subtitles=mysub.srt output.mp4
Advanced :
ffmpeg -i input.mp4 -vf subtitles="f=mysub.srt:force_style='FontName=Arial Bold,FontSize=22,PrimaryColour=&H0009FAFD,OutlineColour=&H00000000,WrapStyle=2,Borderstyle=1,Outline=1,Shadow=1'" -y output.mp4
for .ASS tag description please read this

Scaling film using ffmpeg
Basic :
ffmpeg -i input.mp4 -vf scale=1028:720 output.mp4
Advanced :
ffmpeg -i input.mp4 -vf scale=-1:720 -c:v libx264 -profile:v high -level:v 3.1 -c:a copy output.mp4

Combining two ffmpeg command
ffmpeg -i input.mp4 -vf "scale=-1:720,subtitles="f=mysub.srt:force_style='FontName=Arial Bold,FontSize=22,PrimaryColour=&H0009FAFD,OutlineColour=&H00000000,WrapStyle=2,Borderstyle=1,Outline=1,Shadow=1'"" -c:v libx264 -profile:v high -level:v 3.1 -y output.mp4

ffmpeg & bash
If you writing ffmpeg script inside bash, you will get "funny error"
Parse error, at least 3 arguments were expected, only 1 given in string....
the point is the bash script seems to produce input (Namely the 'c' key) which interferes with the ffmpeg process. just add >/dev/null at the end of the ffmpeg command to prevent ffmpeg from reading its standard input, see example below:
ffmpeg -i input.mp4 -vf scale=1028:720 output.mp4 >/dev/null
for more information you can read it here

Tuesday, October 25, 2016

Increasing Java Heap Memory Size on Openfire 4.0.3 (Slackware 14.0 and Debian 8.5)

Slackware 14.0
Openfire Version : 4.0.3
Installed location : /opt/openfire

increasing java heap memory size
creating openfire.vmoptions
root:# touch /opt/openfire/bin/openfire.vmoptions

and at this value to openfire.vmoptions (mine is max 1GB), change value as needed.
root:# mcedit /opt/openfire/bin/openfire.vmoptions
-Xms512m
-Xmx1024m

Testing

Start openfire and grep it to see if variable inside openfire.vmoptions used or not.

root:# ps ax | grep -i openfire
13488 pts/1    Sl     1:09 /usr/lib/java/bin/java -server -Dinstall4j.jvmDir=/usr/lib/java -Dexe4j.moduleName=/opt/openfire/bin/openfire -DopenfireHome=/opt/openfire/bin/../ -Dopenfire.lib.dir=/opt/openfire/lib -Dinstall4j.launcherId=22 -Dinstall4j.swt=false -Di4jv=0 -Di4jv=0 -Di4jv=0 -Di4jv=0 -Di4jv=0 -Xms512m -Xmx1024m -Di4j.vpt=true -classpath /opt/openfire/.install4j/i4jruntime.jar:/opt/openfire/lib/bcpg-jdk15on.jar:/opt/openfire/lib/bcpkix-jdk15on.jar:/opt/openfire/lib/bcprov-jdk15on.jar:/opt/openfire/lib/hsqldb.jar:/opt/openfire/lib/javax.websocket-api.jar:/opt/openfire/lib/jtds.jar:/opt/openfire/lib/mail.jar:/opt/openfire/lib/mysql.jar:/opt/openfire/lib/npn-boot.jar:/opt/openfire/lib/openfire.jar:/opt/openfire/lib/postgres.jar:/opt/openfire/lib/slf4j-log4j12.jar:/opt/openfire/lib/startup.jar com.install4j.runtime.launcher.UnixLauncher start e44106de /opt/openfire/bin/../logs/stderror.log /opt/openfire/bin/../logs/stdoutt.log org.jivesoftware.openfire.starter.ServerStarter
16615 pts/1    S+     0:00 grep -i openfire
See -Xms512m -Xmx1024m inside grep command

Debian 8.5
Openfire Version : 4.0.3
Installed location : /usr/share/openfire

root@triton:/var/lib# cat /etc/default/openfire
# Defaults for openfire initscript
# sourced by /etc/init.d/openfire
# installed at /etc/default/openfire by the maintainer scripts

#
# This is a POSIX shell fragment
#

# If you wish to override the auto-detected JAVA_HOME variable, uncomment
# and change the following line.
#JAVA_HOME=/usr/java/default

# Additional options that are passed to the Daemon.
DAEMON_OPTS=""

change to

root@triton:/var/lib# cat /etc/default/openfire
# Defaults for openfire initscript
# sourced by /etc/init.d/openfire
# installed at /etc/default/openfire by the maintainer scripts

#
# This is a POSIX shell fragment
#

# If you wish to override the auto-detected JAVA_HOME variable, uncomment
# and change the following line.
#JAVA_HOME=/usr/java/default

# Additional options that are passed to the Daemon.
# DAEMON_OPTS=""

DAEMON_OPTS="-Xms512m -Xmx1024

Testing

root@triton:/etc/default# ps -ax | grep -i openfire
26071 ?        Sl     0:06 /usr/lib/jvm/java-7-openjdk-amd64/jre/bin/java -Xms512m -Xmx1024m -server -DopenfireHome=/usr/share/openfire -Dopenfire.lib.dir=/usr/share/openfire/lib -classpath /usr/share/openfire/lib/startup.jar -jar /usr/share/openfire/lib/startup.jar  
See -Xms512m -Xmx1024m inside grep command

Before

Before increasing Java Memory to 1GB

After increasing Java Memory to 1GB


Openfire RSA Certificate issue (RSA certificate not valid)

I got this error after moving my openfire database from Slackware 14.0 to Debian 8.5,

but it just simple problem and openfire already have this solution, just follow this step to resolve issue. Now open TLS/SSL Crtificates tab, and Delete ALL certificates there.


Now you should get new certificates


And everything back to normal


Moving Openfire 4.0.3 Embedded Database from Slackware 14.0 to Debian 8.5

Slackware 14.0

embedded-db location is at  /opt/openfire/embedded-db/ that because im installing Openfire at directory /opt

root:# ls -al /opt/openfire/embedded-db/
total 172672
drwxr-xr-x  2 root root      4096 Oct 24 13:26 ./
drwxr-xr-x 12 root root      4096 Sep  5 09:52 ../
-rw-r--r--  1 root root        16 Oct 24 13:35 openfire.lck
-rw-r--r--  1 root root   4236557 Oct 24 13:35 openfire.log
-rw-r--r--  1 root root       410 Oct 24 13:26 openfire.properties
-rw-r--r--  1 root root 172378422 Oct 24 13:26 openfire.script

Basicly embedded openfire database is only script, yes it just one script contains many SQL command, and that script is openfire.script inside directory embedded-db.

Okay, before we doing backup for directory embedded-db, we must stop openfire service.
root:# /etc/rc.d/rc.openfire stop

Then zip it using zip tool
root:# zip -r embedded-db.slackware.zip embedded-db/
updating: embedded-db/ (stored 0%)
  adding: embedded-db/openfire.properties (deflated 42%)
  adding: embedded-db/openfire.script (deflated 89%)
  adding: embedded-db/openfire.lck (stored 0%)

And you will get embedded-db.slackware.zip (you can use another name) and copy embedded-db.slackware.zip  to Debian 8.5.


Debian 8.5 
embedded-db location is at /usr/share/openfire/ but linked to /var/lib/openfire/embedded-db/

root@triton:~# ls -al /var/lib/openfire/embedded-db/
total 21104
drwxr-x--- 2 openfire openfire     4096 Oct 23 08:20 .
drwxr-x--- 5 openfire openfire     4096 Sep 28 12:54 ..
-rw-r--r-- 1 openfire openfire       16 Oct 23 08:48 openfire.lck
-rw-r--r-- 1 openfire openfire 12878456 Oct 23 08:48 openfire.log
-rw-r--r-- 1 openfire openfire      410 Oct 23 08:20 openfire.properties
-rw-r--r-- 1 openfire openfire  8706332 Oct 23 08:20 openfire.script

Okay, before we doing backup for directory embedded-db, we must stop openfire service.
root@triton:# /etc/init.d/openfire stop

Then zip it using zip tool
root@triton:/var/lib/openfire# zip -r embedded-db.debian.zip embedded-db
  adding: embedded-db/ (stored 0%)
  adding: embedded-db/openfire.properties (deflated 43%)
  adding: embedded-db/openfire.script (deflated 58%)

Delete directory embedded-db
root@triton:/var/lib/openfire# rm -Rf embedded-db

root@triton:/var/lib/openfire# ls -al
total 22484
drwxr-x---  4 openfire openfire     4096 Oct 23 09:05 .
drwxr-xr-x 57 root     root         4096 Sep  7 22:24 ..
-rw-r--r--  1 root     root     19350774 Oct 24  2016 embedded-db.slackware.zip
-rw-r--r--  1 root     root      3652635 Oct 23 09:03 embedded-db.debian.zip
drwxr-xr-x  3 openfire openfire     4096 Sep 28 12:54 .java
drwxr-x--- 18 openfire openfire     4096 Sep  8 00:07 plugins

Now unzip embedded-db.slackware.zip
root@triton:# unzip embedded-db.slackware.zip

make it become openfire owner with this command
root@triton:/var/lib/openfire# chown openfire:openfire embedded-db -R

Start debian openfire with this command
root@triton:# /etc/init.d/openfire start


open your openfire server at : http://your.openfire.url:9090 and change this value
server --> server manager --> system properties -->xmpp.domain
server --> server manager --> system information-->edit properties (button - left bottom) --> server name

After moving database from one server to another server maybe you will get RSA Certificate issue (RSA certificate not valid), follow this step to resolve it.

Saturday, July 30, 2016

How to Backup and Restore PostgreSQL 9.5.1 Database

Change your current user to postgres
root@ubuntu:~# su postgres
postgres@ubuntu:/root$ cd /tmp/

Listing all database inside postgresql
postgres@ubuntu:/tmp$ psql -l
List of databases
Name    |  Owner   | Encoding |   Collate   |    Ctype    |   Access privileges
-----------+----------+----------+-------------+-------------+-----------------------
newdes    | postgres | UTF8     | en_US.UTF-8 | en_US.UTF-8 |
postgres  | postgres | UTF8     | en_US.UTF-8 | en_US.UTF-8 |
template0 | postgres | UTF8     | en_US.UTF-8 | en_US.UTF-8 | =c/postgres          +
|          |          |             |             | postgres=CTc/postgres
template1 | postgres | UTF8     | en_US.UTF-8 | en_US.UTF-8 | postgres=CTc/postgres+
|          |          |             |             | =c/postgres
(4 rows)

Backing up single database (using pg_dump not pg_dumpall)


For your info, you can't restore plain backup using pg_restore, but you must using psql tool, for more information about this, you can read this.

Plain Backup (text file)
you can open this backup using text editor, like vi, nano, mcedit, pico, etc.
postgres@ubuntu:/tmp$ pg_dump newdes > /tmp/newdes_30072016.sql

Compressed binary format
postgres@ubuntu:/tmp$ pg_dump -Fc newdes > /tmp/newdes_30072016.bak

Tarball file
can restoring using pgadmin
postgres@ubuntu:/tmp$ pg_dump -Ft newdes > /tmp/newdes_30072016.tar

postgres@ubuntu:/tmp$ ls -al /tmp/
total 10592
drwxrwxrwt  3 www-data users      20480 Jul 30 10:08 .
drwxr-xr-x 22 root     root        4096 Jul 20 16:19 ..
-rwxrw-rw-  1 root     kraken   6059213 Jul 30 08:12 kraken.backup
drwx------  2 root     root        4096 Jul 30 09:56 mc-root
-rw-rw-r--  1 postgres postgres  465051 Jul 30 10:08 newdes_30072016.bak
-rw-rw-r--  1 postgres postgres 2112274 Jul 30 10:08 newdes_30072016.sql
-rw-rw-r--  1 postgres postgres 2174464 Jul 30 10:08 newdes_30072016.tar


Restoring backup database

postgres@ubuntu:/tmp$ psql --version
psql (PostgreSQL) 9.5.1

Create empty database
From root user (or another user)
root@ubuntu:~# createdb -h localhost -p 5432 -U postgres newdes
Password: ****

Or from postgres user
root@ubuntu:~# su postgres
postgres@ubuntu:/tmp$ psql -l
postgres@ubuntu:/tmp$ createdb newdes;

Listing all database inside postgresql
postgres@ubuntu:/tmp$ psql -l
                                  List of databases
   Name    |  Owner   | Encoding |   Collate   |    Ctype    |   Access privileges
-----------+----------+----------+-------------+-------------+-----------------------
 newdes    | postgres | UTF8     | en_US.UTF-8 | en_US.UTF-8 |
 postgres  | postgres | UTF8     | en_US.UTF-8 | en_US.UTF-8 |
 template0 | postgres | UTF8     | en_US.UTF-8 | en_US.UTF-8 | =c/postgres          +
           |          |          |             |             | postgres=CTc/postgres
 template1 | postgres | UTF8     | en_US.UTF-8 | en_US.UTF-8 | postgres=CTc/postgres+
           |          |          |             |             | =c/postgres
(4 rows)


Restoring Plain backup (database already exist)

Alternative command 1
postgres@ubuntu:/tmp$ createdb newdes;
postgres@ubuntu:/tmp$ psql newdes -f newdes_30072016.sql
SET
SET
SET
SET
SET
SET
SET
CREATE SCHEMA
ALTER SCHEMA
CREATE SCHEMA
ALTER SCHEMA
CREATE SCHEMA
ALTER SCHEMA
----

Alternative command 2
postgres@ubuntu:/tmp$ createdb newdes;
postgres@ubuntu:/tmp$ psql -f newdes_30072016.sql template1
SET
SET
SET
SET
SET
SET
SET
CREATE SCHEMA
ALTER SCHEMA
CREATE SCHEMA
ALTER SCHEMA
CREATE SCHEMA
ALTER SCHEMA
----

Alternative command 3
postgres@ubuntu:/tmp$ createdb newdes;
postgres@ubuntu:/tmp$ psql -U postgres < newdes_30072016.sql
SET
SET
SET
SET
SET
SET
SET
CREATE SCHEMA
ALTER SCHEMA
CREATE SCHEMA
ALTER SCHEMA
CREATE SCHEMA
ALTER SCHEMA
----

Alternative command 4
postgres@ubuntu:/tmp$ createdb newdes;
postgres@ubuntu:/tmp$ psql -f newdes_30072016.sql postgres
SET
SET
SET
SET
SET
SET
SET
CREATE SCHEMA
ALTER SCHEMA
CREATE SCHEMA
ALTER SCHEMA
CREATE SCHEMA
ALTER SCHEMA
----


Restoring compressed binary format
pg_restore -Fc newdes_30072016.bak

Restoring tarball file
pg_restore -Ft newdes_30072016.tar


Restoring Plain backup (database NOT exist)

Restoring compressed binary format
pg_restore -Fc -C newdes_30072016.bak

Restoring tarball file
pg_restore -Ft -C newdes_30072016.tar

How to Backup and Restore PostgreSQL 9.5.1 Database

Change your current user to postgres
root@ubuntu:~# su postgres
postgres@ubuntu:/root$ cd /tmp/

Listing all database inside postgresql
postgres@ubuntu:/tmp$ psql -l
List of databases
Name    |  Owner   | Encoding |   Collate   |    Ctype    |   Access privileges
-----------+----------+----------+-------------+-------------+-----------------------
newdes    | postgres | UTF8     | en_US.UTF-8 | en_US.UTF-8 |
postgres  | postgres | UTF8     | en_US.UTF-8 | en_US.UTF-8 |
template0 | postgres | UTF8     | en_US.UTF-8 | en_US.UTF-8 | =c/postgres          +
|          |          |             |             | postgres=CTc/postgres
template1 | postgres | UTF8     | en_US.UTF-8 | en_US.UTF-8 | postgres=CTc/postgres+
|          |          |             |             | =c/postgres
(4 rows)

Backing up single database (using pg_dump not pg_dumpall)


For your info, you can't restore plain backup using pg_restore, but you must using psql tool, for more information about this, you can read this.

Plain Backup (text file)
you can open this backup using text editor, like vi, nano, mcedit, pico, etc.
postgres@ubuntu:/tmp$ pg_dump newdes > /tmp/newdes_30072016.sql

Compressed binary format
postgres@ubuntu:/tmp$ pg_dump -Fc newdes > /tmp/newdes_30072016.bak

Tarball file
can restoring using pgadmin
postgres@ubuntu:/tmp$ pg_dump -Ft newdes > /tmp/newdes_30072016.tar

postgres@ubuntu:/tmp$ ls -al /tmp/
total 10592
drwxrwxrwt  3 www-data users      20480 Jul 30 10:08 .
drwxr-xr-x 22 root     root        4096 Jul 20 16:19 ..
-rwxrw-rw-  1 root     kraken   6059213 Jul 30 08:12 kraken.backup
drwx------  2 root     root        4096 Jul 30 09:56 mc-root
-rw-rw-r--  1 postgres postgres  465051 Jul 30 10:08 newdes_30072016.bak
-rw-rw-r--  1 postgres postgres 2112274 Jul 30 10:08 newdes_30072016.sql
-rw-rw-r--  1 postgres postgres 2174464 Jul 30 10:08 newdes_30072016.tar


Restoring backup database

postgres@ubuntu:/tmp$ psql --version
psql (PostgreSQL) 9.5.1

Create empty database
From root user (or another user)
root@ubuntu:~# createdb -h localhost -p 5432 -U postgres newdes
Password: ****

Or from postgres user
root@ubuntu:~# su postgres
postgres@ubuntu:/tmp$ psql -l
postgres@ubuntu:/tmp$ createdb newdes;

Listing all database inside postgresql
postgres@ubuntu:/tmp$ psql -l
                                  List of databases
   Name    |  Owner   | Encoding |   Collate   |    Ctype    |   Access privileges
-----------+----------+----------+-------------+-------------+-----------------------
 newdes    | postgres | UTF8     | en_US.UTF-8 | en_US.UTF-8 |
 postgres  | postgres | UTF8     | en_US.UTF-8 | en_US.UTF-8 |
 template0 | postgres | UTF8     | en_US.UTF-8 | en_US.UTF-8 | =c/postgres          +
           |          |          |             |             | postgres=CTc/postgres
 template1 | postgres | UTF8     | en_US.UTF-8 | en_US.UTF-8 | postgres=CTc/postgres+
           |          |          |             |             | =c/postgres
(4 rows)


Restoring Plain backup (empty database already exist)

Alternative command 1
postgres@ubuntu:/tmp$ createdb newdes;
postgres@ubuntu:/tmp$ psql newdes -f newdes_30072016.sql
SET
SET
SET
SET
SET
SET
SET
CREATE SCHEMA
ALTER SCHEMA
CREATE SCHEMA
ALTER SCHEMA
CREATE SCHEMA
ALTER SCHEMA
----

Alternative command 2
postgres@ubuntu:/tmp$ createdb newdes;
postgres@ubuntu:/tmp$ psql -f newdes_30072016.sql template1
SET
SET
SET
SET
SET
SET
SET
CREATE SCHEMA
ALTER SCHEMA
CREATE SCHEMA
ALTER SCHEMA
CREATE SCHEMA
ALTER SCHEMA
----

Alternative command 3
postgres@ubuntu:/tmp$ createdb newdes;
postgres@ubuntu:/tmp$ psql -U postgres < newdes_30072016.sql
SET
SET
SET
SET
SET
SET
SET
CREATE SCHEMA
ALTER SCHEMA
CREATE SCHEMA
ALTER SCHEMA
CREATE SCHEMA
ALTER SCHEMA
----

Alternative command 4
postgres@ubuntu:/tmp$ createdb newdes;
postgres@ubuntu:/tmp$ psql -f newdes_30072016.sql postgres
SET
SET
SET
SET
SET
SET
SET
CREATE SCHEMA
ALTER SCHEMA
CREATE SCHEMA
ALTER SCHEMA
CREATE SCHEMA
ALTER SCHEMA
----


Restoring compressed binary format
pg_restore -Fc newdes_30072016.bak

Restoring tarball file
pg_restore -Ft newdes_30072016.tar


Restoring Plain backup (database NOT exist)

Restoring compressed binary format
pg_restore -Fc -C newdes_30072016.bak

Restoring tarball file
pg_restore -Ft -C newdes_30072016.tar

Monday, June 08, 2015

Linux Advanced Copy ( Modified Original cp Command )

Advanced-Copy is a powerful command line program which is modified version of original cp command. This modified version of cp command adds a progress bar and etc. shortly, it's much better than original cp command. How to get advanced copy on Debian "Wheezy" 7.8 .And this step work and tested. Download all required file all in one from HERE
root@prc-04:/tmp# wget https://www.dropbox.com/s/o9rs7o0l0569iv3/coreutils-8.4-receipt.tar.gz?dl=0
root@prc-04:/tmp# mv -v coreutils-8.4-receipt.tar.gz?dl=0 coreutils-8.4-receipt.tar.gz
Extract it
#root@prc-04:/tmp# tar -zxvf coreutils-8.4-receipt.tar.gz
coreutils-8.4.tar.gz
coreutils-8.4.patch
Extract coreutils-8.4.tar.gz
root@prc-04:/tmp# tar -zxvf coreutils-8.4.tar.gz
Copy file pacth
root@prc-04:/tmp# cp -v coreutils-8.4.patch coreutils-8.4/
`coreutils-8.4.patch' ---> `coreutils-8.4/coreutils-8.4.patch'
Go to coreutils-8.4/
root@prc-04:/tmp# cd coreutils-8.4/
root@prc-04:/tmp/coreutils-8.4#
Patch it
root@prc-04:/tmp/coreutils-8.4# patch -p1 -i coreutils-8.4.patch
(Stripping trailing CRs from patch.)patching file src/copy.c
(Stripping trailing CRs from patch.)patching file src/copy.h
(Stripping trailing CRs from patch.)patching file src/cp.c
(Stripping trailing CRs from patch.)patching file src/mv.c
patch unexpectedly ends in middle of line
Hunk #5 succeeded at 500 with fuzz 1.
Configure
root@prc-04:/tmp/coreutils-8.4#./configure
Make it
root@prc-04:/tmp/coreutils-8.4#make
Once, compilation completes, two new commands are created under src/cp and src/mv. You need to replace your original cp and mv commands with these two new commands to get the progress bar while copying files. Replace original cp and mv file
root@prc-04:/tmp/coreutils-8.4#cp src/cp /usr/local/bin/cp
root@prc-04:/tmp/coreutils-8.4# cp src/mv /usr/local/bin/mv
BUT If you don’t want to copy these commands under standard system paths, you can still run them from source directory like “./cp” and “./mv“.
root@prc-04:/tmp/coreutils-8.4/src# ./cp --version
cp (GNU coreutils) 8.4
Copyright (C) 2010 Free Software Foundation, Inc.
License GPLv3+: GNU GPL version 3 or later .
This is free software: you are free to change and redistribute it.
There is NO WARRANTY, to the extent permitted by law.

Written by Torbjörn Granlund, David MacKenzie, and Jim Meyering.


root@prc-04:/tmp/coreutils-8.4/src# ./mv --version
mv (GNU coreutils) 8.4
Copyright (C) 2010 Free Software Foundation, Inc.
License GPLv3+: GNU GPL version 3 or later .
This is free software: you are free to change and redistribute it.
There is NO WARRANTY, to the extent permitted by law.

Written by Mike Parker, David MacKenzie, and Jim Meyering.
Option to show progress bar while copying, add -g
root@prc-04:/tmp/coreutils-8.4/src# ./cp --help | grep progress

-g, --progress-bar add progress-bar

root@prc-04:/tmp/coreutils-8.4/src# ./mv --help | grep progress

-g, --progress-bar add progress-bar
Copying example.
root@prc-04:/tmp/coreutils-8.4/src# ./cp -g /tmp/test.img /tmp/tes

root@prc-04:/tmp/coreutils-8.4/src# 861.7 MiB / 1.0 GiB[|||||||||||||||||||||||||||||||||||||||||||||||||||||||||||||||||||||||||||||||||||||||||||||||||||||||||||||||||||||||||||||||||||||--------------------------] 84.1 % Copying at 52.6 MiB/s (about 0h 0m 0s remaining) /tmp/test.img 861.7 MiB / 1.0 GiB[|||||||||||||||||||||||||||||||||||||||||||||||||||||||||||||||||||||||||||||||||||||||||||||||||||||||||||||||||||||||||||||||||||||--------------------------] 84.1 % Done

Monday, January 19, 2015

Password Protection with htaccess


You can protecting directory on apache web server so no unauthorized people may access it, in here we would like use .htaccess file (there is DOT at front htaccess file name) on apache root directory.

root:# cat .htaccess
AuthType Basic
AuthName "Restricted Access"
AuthUserFile /home/apasswords
Require user anjani
root:# ls -al .htaccess
-rw-r--r-- 1 root root 103 Oct  9 08:38 .htaccess


Make password for user anjani and save it on file /home/apasswords


root:# htpasswd -c /home/apasswords anjani
New password: ******
Re-type new password: ******
Adding password for user anjani
root:# cat /home/apasswords
anjani:jBdra06B5M54.


The password on the appasswords is encrypted


root:# ls -al /home/apasswords
-rw-r--r-- 1 root root 21 Oct  9 14:18 /home/apasswords
Done.

Tuesday, December 03, 2013

Integrating KeePass 2 with Android 4.2.x

Requirement :

1. KeePass Version 2.x or Higher, get it from here
2. Download KeePass2Android Password Safe from here

Instalation :

1. Just click install on it.
2. Now open KeePass2Android program, and choose "Open file..."


3.  Choose Dropbox and locate it to your_database.kdbx.


4. Giving access to your dropbox


5. Type your masterkey password


6. Done


7. Done


Integrating KeePass with :

1. DropBox
2. Firefox
3. Chrome

Integrating KeePass 2 with Firefox (Windows 7 Pro 64 Bit)

Requirement :

1. KeePass Version 2.x or Higher, get it from here
2. Download KeeFox from here

Instalation

1. Close your KeePass Version 2.x (this is important - don't ignore it)

2. Run KeeFox instalation by clicking on add to firefox button, and follow instruction.


 3. After instalation KeeFox will automatically open setup form.


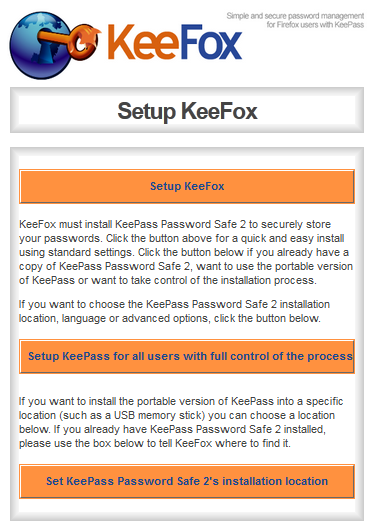
4. Clik on "More information and advanced setup options" button, i choose this because i'm already have KeePass Safe (portable Version).


5. Click "Set KeePass Password Safe 2's installation location" to locate your keepass instalation directory. KeeFox will try to run your KeePass Safe aplication and open it database, allow it.


6. Enter your master password to open KeePass database.


7. You should see something like picture bellow, it mean your setup is success.

8. Now it is time to test our instalation, go to what ever website with login page, in this case, i choose yahoo mail, and if the login form automatically fill up, it mean your instalation worked.

9. Done


Integrating KeePass with :

1. DropBox
2. Chrome
3. Android