Showing posts with label Slackware. Show all posts

Tuesday, October 25, 2016

Increasing Java Heap Memory Size on Openfire 4.0.3 (Slackware 14.0 and Debian 8.5)

Slackware 14.0
Openfire Version : 4.0.3
Installed location : /opt/openfire

increasing java heap memory size
creating openfire.vmoptions
root:# touch /opt/openfire/bin/openfire.vmoptions

and at this value to openfire.vmoptions (mine is max 1GB), change value as needed.
root:# mcedit /opt/openfire/bin/openfire.vmoptions
-Xms512m
-Xmx1024m

Testing

Start openfire and grep it to see if variable inside openfire.vmoptions used or not.

root:# ps ax | grep -i openfire
13488 pts/1    Sl     1:09 /usr/lib/java/bin/java -server -Dinstall4j.jvmDir=/usr/lib/java -Dexe4j.moduleName=/opt/openfire/bin/openfire -DopenfireHome=/opt/openfire/bin/../ -Dopenfire.lib.dir=/opt/openfire/lib -Dinstall4j.launcherId=22 -Dinstall4j.swt=false -Di4jv=0 -Di4jv=0 -Di4jv=0 -Di4jv=0 -Di4jv=0 -Xms512m -Xmx1024m -Di4j.vpt=true -classpath /opt/openfire/.install4j/i4jruntime.jar:/opt/openfire/lib/bcpg-jdk15on.jar:/opt/openfire/lib/bcpkix-jdk15on.jar:/opt/openfire/lib/bcprov-jdk15on.jar:/opt/openfire/lib/hsqldb.jar:/opt/openfire/lib/javax.websocket-api.jar:/opt/openfire/lib/jtds.jar:/opt/openfire/lib/mail.jar:/opt/openfire/lib/mysql.jar:/opt/openfire/lib/npn-boot.jar:/opt/openfire/lib/openfire.jar:/opt/openfire/lib/postgres.jar:/opt/openfire/lib/slf4j-log4j12.jar:/opt/openfire/lib/startup.jar com.install4j.runtime.launcher.UnixLauncher start e44106de /opt/openfire/bin/../logs/stderror.log /opt/openfire/bin/../logs/stdoutt.log org.jivesoftware.openfire.starter.ServerStarter
16615 pts/1    S+     0:00 grep -i openfire
See -Xms512m -Xmx1024m inside grep command

Debian 8.5
Openfire Version : 4.0.3
Installed location : /usr/share/openfire

root@triton:/var/lib# cat /etc/default/openfire
# Defaults for openfire initscript
# sourced by /etc/init.d/openfire
# installed at /etc/default/openfire by the maintainer scripts

#
# This is a POSIX shell fragment
#

# If you wish to override the auto-detected JAVA_HOME variable, uncomment
# and change the following line.
#JAVA_HOME=/usr/java/default

# Additional options that are passed to the Daemon.
DAEMON_OPTS=""

change to

root@triton:/var/lib# cat /etc/default/openfire
# Defaults for openfire initscript
# sourced by /etc/init.d/openfire
# installed at /etc/default/openfire by the maintainer scripts

#
# This is a POSIX shell fragment
#

# If you wish to override the auto-detected JAVA_HOME variable, uncomment
# and change the following line.
#JAVA_HOME=/usr/java/default

# Additional options that are passed to the Daemon.
# DAEMON_OPTS=""

DAEMON_OPTS="-Xms512m -Xmx1024

Testing

root@triton:/etc/default# ps -ax | grep -i openfire
26071 ?        Sl     0:06 /usr/lib/jvm/java-7-openjdk-amd64/jre/bin/java -Xms512m -Xmx1024m -server -DopenfireHome=/usr/share/openfire -Dopenfire.lib.dir=/usr/share/openfire/lib -classpath /usr/share/openfire/lib/startup.jar -jar /usr/share/openfire/lib/startup.jar  
See -Xms512m -Xmx1024m inside grep command

Before

Before increasing Java Memory to 1GB

After increasing Java Memory to 1GB


Openfire RSA Certificate issue (RSA certificate not valid)

I got this error after moving my openfire database from Slackware 14.0 to Debian 8.5,

but it just simple problem and openfire already have this solution, just follow this step to resolve issue. Now open TLS/SSL Crtificates tab, and Delete ALL certificates there.


Now you should get new certificates


And everything back to normal


Moving Openfire 4.0.3 Embedded Database from Slackware 14.0 to Debian 8.5

Slackware 14.0

embedded-db location is at  /opt/openfire/embedded-db/ that because im installing Openfire at directory /opt

root:# ls -al /opt/openfire/embedded-db/
total 172672
drwxr-xr-x  2 root root      4096 Oct 24 13:26 ./
drwxr-xr-x 12 root root      4096 Sep  5 09:52 ../
-rw-r--r--  1 root root        16 Oct 24 13:35 openfire.lck
-rw-r--r--  1 root root   4236557 Oct 24 13:35 openfire.log
-rw-r--r--  1 root root       410 Oct 24 13:26 openfire.properties
-rw-r--r--  1 root root 172378422 Oct 24 13:26 openfire.script

Basicly embedded openfire database is only script, yes it just one script contains many SQL command, and that script is openfire.script inside directory embedded-db.

Okay, before we doing backup for directory embedded-db, we must stop openfire service.
root:# /etc/rc.d/rc.openfire stop

Then zip it using zip tool
root:# zip -r embedded-db.slackware.zip embedded-db/
updating: embedded-db/ (stored 0%)
  adding: embedded-db/openfire.properties (deflated 42%)
  adding: embedded-db/openfire.script (deflated 89%)
  adding: embedded-db/openfire.lck (stored 0%)

And you will get embedded-db.slackware.zip (you can use another name) and copy embedded-db.slackware.zip  to Debian 8.5.


Debian 8.5 
embedded-db location is at /usr/share/openfire/ but linked to /var/lib/openfire/embedded-db/

root@triton:~# ls -al /var/lib/openfire/embedded-db/
total 21104
drwxr-x--- 2 openfire openfire     4096 Oct 23 08:20 .
drwxr-x--- 5 openfire openfire     4096 Sep 28 12:54 ..
-rw-r--r-- 1 openfire openfire       16 Oct 23 08:48 openfire.lck
-rw-r--r-- 1 openfire openfire 12878456 Oct 23 08:48 openfire.log
-rw-r--r-- 1 openfire openfire      410 Oct 23 08:20 openfire.properties
-rw-r--r-- 1 openfire openfire  8706332 Oct 23 08:20 openfire.script

Okay, before we doing backup for directory embedded-db, we must stop openfire service.
root@triton:# /etc/init.d/openfire stop

Then zip it using zip tool
root@triton:/var/lib/openfire# zip -r embedded-db.debian.zip embedded-db
  adding: embedded-db/ (stored 0%)
  adding: embedded-db/openfire.properties (deflated 43%)
  adding: embedded-db/openfire.script (deflated 58%)

Delete directory embedded-db
root@triton:/var/lib/openfire# rm -Rf embedded-db

root@triton:/var/lib/openfire# ls -al
total 22484
drwxr-x---  4 openfire openfire     4096 Oct 23 09:05 .
drwxr-xr-x 57 root     root         4096 Sep  7 22:24 ..
-rw-r--r--  1 root     root     19350774 Oct 24  2016 embedded-db.slackware.zip
-rw-r--r--  1 root     root      3652635 Oct 23 09:03 embedded-db.debian.zip
drwxr-xr-x  3 openfire openfire     4096 Sep 28 12:54 .java
drwxr-x--- 18 openfire openfire     4096 Sep  8 00:07 plugins

Now unzip embedded-db.slackware.zip
root@triton:# unzip embedded-db.slackware.zip

make it become openfire owner with this command
root@triton:/var/lib/openfire# chown openfire:openfire embedded-db -R

Start debian openfire with this command
root@triton:# /etc/init.d/openfire start


open your openfire server at : http://your.openfire.url:9090 and change this value
server --> server manager --> system properties -->xmpp.domain
server --> server manager --> system information-->edit properties (button - left bottom) --> server name

After moving database from one server to another server maybe you will get RSA Certificate issue (RSA certificate not valid), follow this step to resolve it.

Monday, January 19, 2015

Password Protection with htaccess


You can protecting directory on apache web server so no unauthorized people may access it, in here we would like use .htaccess file (there is DOT at front htaccess file name) on apache root directory.

root:# cat .htaccess
AuthType Basic
AuthName "Restricted Access"
AuthUserFile /home/apasswords
Require user anjani
root:# ls -al .htaccess
-rw-r--r-- 1 root root 103 Oct  9 08:38 .htaccess


Make password for user anjani and save it on file /home/apasswords


root:# htpasswd -c /home/apasswords anjani
New password: ******
Re-type new password: ******
Adding password for user anjani
root:# cat /home/apasswords
anjani:jBdra06B5M54.


The password on the appasswords is encrypted


root:# ls -al /home/apasswords
-rw-r--r-- 1 root root 21 Oct  9 14:18 /home/apasswords
Done.

Monday, April 15, 2013

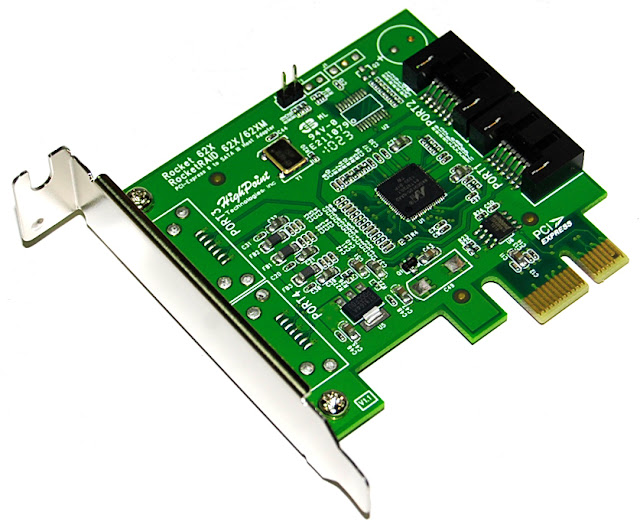
[SOLVED] HighPoint RocketRAID 620 - 88SE9125 SATA Controller

After several days of fighting with the mysterious 88SE9125 SATA Controller from HighPoint RocketRAID 620, finally I found the easiest way to solve this problem, this problem has been much discussed in many forums. But most of the discussion only on how to install the driver from the HighPoint, I've tried but still failed, even I get Slackware upgrade from version 12 to 14, but still failed. until finally I decided to do a kernel recompile from scratch. and successfully. and here is my journey.

HighPoint RocketRAID 620 - 88SE9125 SATA Controller


Download latest kernel and extract it.
cd /tmp
wget https://www.kernel.org/pub/linux/kernel/v3.x/linux-3.8.7.tar.xz
tar -xvf linux-3.8.7.tar.xz -C /usr/src/linux

Remove the old symlink
rm -f /usr/src/linux
cd /usr/src
ln -s linux-3.8.7 linux

To begin to compile the kernel, I need a config file, but I do not want to start from scratch by doing a check one by one the options in menuconfig, I could just take the config from kernel-smp-3.2.9 but I do not want it, because that kernel does not able to detect the SATA controller, so I decided to take the config file from Slax kernel 7.0, because slax 7.0 using kernel-3.8.2 and able to detect the SATA Controller.

Get config file from slax 7.0
cd /tmp
wget http://ftp.slax.org/Slax-7.x-development/sources/Slax-7.0-sources/kernel/.config-i486
cp -v .config-i486 .config /usr/src/linux/.config

Now Let's start compiling kernel, Run make oldconfig in the kernel source directory, so processes will use config from the .config file you just copied.

Compiling kernel
cd /usr/src/linux
make oldconfig
make menuconfig # if you want change something do it now, but i don't touch it and it worked for me.

Now, start the build of kernel and modules, and install them to the proper places.
make bzImage modules # compile the kernel and the modules
make modules_install # installs the modules to /lib/modules/

Copying file to correct director
cp -v arch/x86/boot/bzImage /boot/vmlinuz-3.8.6-10.04.13-diantokam # copy the new kernel file
cp -v System.map /boot/System.map-3.8.6-10.04.13-diantokam # copy the System.map (optional)
cp -v .config /boot/config-3.8.6-10.04.13-diantokam # backup copy of your kernel config

Fixing some symlink on /boot directory
cd /boot
rm -f System.map # delete the old link
ln -s System.map-3.8.6-10.04.13-diantokam System.map # create a new link
ln -s vmlinuz-3.8.6-10.04.13-diantokam vmlinuz # create a new kernel link

Updating initrd
In case your kernel does not include the driver for your root filesystem, or a driver for your SATA bus, or other stuff that is only built as modules, your kernel will panic if it boots and can not access the necessary disks, partitions and/or files
cd /boot
wget http://www.slackware.com/~alien/tools/mkinitrd_command_generator.sh
sh mkinitrd_command_generator.sh

#
# mkinitrd_command_generator.sh revision 1.45
#
# This script will now make a recommendation about the command to use
# in case you require an initrd image to boot a kernel that does not
# have support for your storage or root filesystem built in
# (such as the Slackware 'generic' kernels').
# A suitable 'mkinitrd' command will be:

mkinitrd -c -k 3.8.6-10.04.13-diantokam -f ext3 -r /dev/sda1 -m usbhid:uhci-hcd:ext3 -u -o /boot/initrd.gz

Now finally we must change rc.module symlink
cd /etc/rc.d/
rm -f rc.modules
ln -s rc.modules-3.8.6-10.04.13-diantokam rc.modules

Now reboot your computer and may pinguin with yo

BUT after rebooting, i still got alot of trouble, because i use 8 SATA and 1 PATA at once, the system always recognize my hardisk with different sequence when i swap out one or maybe some disk for testing, that way i suggest all of you to using UUID on grub menu.lst, 

And here is my menu.lst:
cat /boot/grub/menu.lst
timeout 10
color light-gray/red black/light-gray
title Slackware 14.0 on (/dev/sda1)
root (hd0,0)
kernel /boot/vmlinuz root=UUID=6eaf2751-c81d-48ca-b896-4d7ff530da5e ro vga=791 raid=noautodetect
initrd /boot/initrd.gz

And here is my disks after finall booting
root:# lshw -short -C disk
H/W path Device Class Description
================================================
/0/2/0.0.0 /dev/sda disk 3TB WDC WD30EZRS-00J <--SATA Controller 88SE1925 Gen2 signaling speed (3.0Gb/s)
/0/3/0.0.0 /dev/sdb disk 3TB WDC WD30EZRS-00J <--SATA Controller 88SE1925 Gen2 signaling speed (3.0Gb/s)
/0/5/0.0.0 /dev/sdc disk 3TB WDC WD30EZRS-00J <--SATA Controller 88SE1925 Gen2 signaling speed (3.0Gb/s)
/0/6/0.0.0 /dev/sdd disk 1TB WDC WD10EADS-00M <--SATA Controller 88SE1925 Gen2 signaling speed (3.0Gb/s)
/0/7/0.0.0 /dev/sde disk 80GB ST380021A <--PATA on MotherBoard
/0/8/0.0.0 /dev/sdf disk 3TB ST3000DM001-1CH1 <--SATA on MotherBoard Gen3 signaling speed (6.0Gb/s)
/0/8/0.1.0 /dev/sdg disk 3TB ST3000DM001-1CH1 <--SATA on MotherBoard Gen3 signaling speed (6.0Gb/s)
/0/9/0.0.0 /dev/sdh disk 3TB ST3000DM001-1CH1 <--SATA on MotherBoard Gen3 signaling speed (6.0Gb/s)
/0/9/0.1.0 /dev/sdi disk 3TB ST3000DM001-1CH1 <--SATA on MotherBoard Gen3 signaling speed (6.0Gb/s)

Tuesday, January 15, 2013

ProFTPD Version 1.3.4a + Slackware 12.0

Berikut setingan Proftpd di slackware, agak sedikit berbeda dengan yang ada di Centos, bila di Centos untuk pembuatan root direktorinya bisa di lakukan dengan pembuatan hard link, namun pada Slackware versi 12.0 hal tersebut tidak bisa dilakukan, sehingga cara satu-satunya adalah dengan membuat virtual direktori untuk masing-masing user.
root:# cat /etc/slackware-version
Slackware 12.0.0
root:# proftpd -v
ProFTPD Version 1.3.4a
root:# proftpd -l
Compiled-in modules:
  mod_core.c
  mod_xfer.c
  mod_auth_unix.c
  mod_auth_file.c
  mod_auth.c
  mod_ls.c
  mod_log.c
  mod_site.c
  mod_delay.c
  mod_facts.c
  mod_ident.c
  mod_readme.c
  mod_ratio.c
  mod_tls.c
  mod_wrap.c
  mod_ctrls_admin.c
  mod_cap.c
  mod_ctrls.c
ServerName                      "FTP Server"
ServerType                      standalone
DefaultServer                   on
DeleteAbortedStores             on
HiddenStores                    on
Port                            21
Umask                           022
MaxInstances                    10
MaxClients                      8
MaxClientsPerHost               8
MaxClientsPerUser               8
MaxHostsPerUser                 8
SystemLog                       /var/log/proftpd.log
TransferLog                     /var/log/xferlog
RequireValidShell               off
User                            nobody
Group                           nogroup
AllowOverwrite                  on


    User                        bel
    Group                       users
    AnonRequirePassword         on
        
            AllowAll


    User                        art
    Group                       users
    AnonRequirePassword         on
        
            AllowAll
        

Friday, October 19, 2012

[SOLVED] Getting PostgreSQL 9.1.4 module for PHP-5.4.7 on Slackware 14

Slackware 14 by default carrying PHP-5.4.7 and running smooth well, BUT unfortunately it doesn't come with PostgreSQL, after searching for a while, i decided to install PostgreSQl from scratch.

PostgreSQL 9.1.4 :
SlackBuild : postgresql.tar.gz

Follow this step to compile and install PostgreSQL 9.1.4 on Slackware 14.0 :
1. cd /tmp
2. wget ftp://ftp.postgresql.org/pub/source/v9.1.4/postgresql-9.1.4.tar.bz2
3. Extract SlackBuild script tar -zxvf postgresql-9.1.4.tar.gz
4. Go to Extracted directory cd postgresql-9.1.4
5. Run this command sh postgresql.SlackBuild /tmp/postgresql-9.1.4.tar.bz2
6. After all finish, it will create /tmp/postgresql-9.1.4-i486-1_SBo.tgz
7. Install it using installpkg postgresql-9.1.4-i486-1_SBo.tgz
8. Run this command su postgres -c "initdb -D /var/lib/pgsql/data"
9. Then run this /etc/rc.d/rc.postgresql start
10. Done

Now, the hard part ^^, actually after you find solution, you will said...Hhhmmm just like that hah :D, because PHP-5.4.7 inside Slackware 14 is not compiled using --with=pgsql option, and because i don't want to touch anything about PHP that i'm already set all option and some configuration running smothly on PHP-5.4.7, and also because my server is used for production. the point is, i just want to add pgsql.so into php.ini. That's it, nothing more.

And here is the solution.

PHP-5.4.7 :
SlackBuild : php-pgsql.tar.gz ( I Know this script for PHP-5.4.6, just relax okay ^^ )

Follow my step please :
1. cd /tmp
2. wget http://www.php.net/distributions/php-5.4.7.tar.bz2
3. wget http://slackbuilds.org/slackbuilds/14.0/libraries/php-pgsql.tar.gz
4. Extract SlackBuild script tar -zxvf php-pgsql.tar.gz
5. Go to extracted directory cd php-pgsql
6. Then mcedit php-pgsql.SlackBuild, and change version to correct one (5.4.7)
7. mcedit php-pgsql.info and change, change version and MD5SUM too.
8. Then run php-pgsql.SlackBuild /tmp/php-pgsql.tar.gz
9. After finish, you should get /tmp/php-pgsql-5.4.7-i486-1_SBo.tgz
10. Installpkg /tmp/php-pgsql-5.4.7-i486-1_SBo.tgz
11. Enable pgsql module by editing mcedit /etc/php/pgsql.ini and enable extension=pgsql.so by removing ;
12. Done

Proved :
root@slackware:~/Desktop# php -m | grep pgsql
If everything okay, you will get pgsql as result.

My info.php


Wednesday, December 14, 2011

PostgreSQL 9.0.4 with Slackware 13.37

PostgreSQL is an advanced object-relational database management system (ORDBMS) based on POSTGRES. With more than 15 years of development history, it is quickly becoming the de facto database for enterprise level open source solutions. This build includes full text search support (tsearch2).
Home: http://www.postgresql.org.Repository: SlackersDownload size: 4,26 MBInstalled size: 22,48 MBPackage filename: postgresql-9.0.4-i686-1cf.txz
Step 1: Download postgresql-9.0.4-i686-1cf.txz for Slackware 13.37 from here and install it.
#installpkg postgresql-9.0.4-i686-1cf.txz
Step 2: Create postgreSQL user account
# adduser postgres# passwd postgresChanging password for user postgres.New UNIX password:Retype new UNIX password:passwd: all authentication tokens updated successfully.

Configuring PostgreSQL 9.0.4 on Slackware 13.37

After succesfully install postgresql on slackware, the next point is to configuring postgresql so it can accessing from network ( local network).


Step 1: edit postgresql.conf
#mcedit /var/lib/pgsql/data/postgresql.conf
change at the connections and authentication section, find the
listen_addresses = 'localhost' and change it to
listen_addresses = '*'
and uncomment
#port =5432 so it becomes
port = 5432
and save it.

Step 2: edit pg_hba.conf
Because i connecting postgresql server from my laptop which have ip number 192.168.110.131 and some times i would like connected from another 192.168.110. ip number, so i editing pg_hba.conf like this
#mcedit /var/lib/pgsql/data/pg_hba.conf
addes this line to pg_hba.conf
host    all     all     192.168.110.0/24     md5

Getting PostgreSQL 9.0.4 module for PHP-5.3.8 on Slackware 13.37

I wanted to play around with PostgreSQL on the test server at work today, and found the slackpack over at LinuxPackages. I was very pleased that I wouldn’t have to compile PostgreSQL from source, as such complex apps will take more time than I would like to invest.

Anyway, once I’ve installed the package, and initialised the database, I decided to give phpPgAdmin a whirl on my freshly baked PostgreSQL installation, but when I try to use it I get an error message telling me that I have not compiled proper database support into my PHP installation.

I checked out my phpinfo(); and sure enough, Slackware‘s package was not built with the --with-pgsql option.

Most of my googling results mention that the only solution is to recompile PHP from scratch, including the --with-pgsql flag. Hmm, I'm really hate to replace my original PHP installation which was done in the “proper” way, ie. via the available slackpack. Who know what the hell I can possibly misconfigure and break!

Slackware 13.37 + Dovecot 2.0.15 (Configuration)

Get Dovecot 2.0.15 from here (dovecot-2.0.15-i686-1cf.txz) then install it
$ upgradepkg --install-new dovecot-2.0.15-i686-1cf.txz
Then, start for configuration
$ cp -v /usr/doc/dovecot-2.0.15/example-config/* /etc/dovecot/

First create user and group for dovecot
groupadd dovecot
useradd -g dovecot dovecot
useradd -g dovecot dovenull
Here Bellow is my worked configuration : Dovecot.conf
# grep -v "#" /etc/dovecot/dovecot.conf

protocols = imap pop3
listen = *
base_dir = /var/run/dovecot/
login_greeting = Dovecot ready.
dict {}
!include conf.d/*.conf
10-auth.conf
$ grep -v "#" /etc/dovecot/conf.d/10-auth.conf

disable_plaintext_auth = yes
auth_mechanisms = plain login
!include auth-system.conf.ext
10-mail.conf
$ grep -v "#" /etc/dovecot/conf.d/10-mail.conf

mail_location = maildir:%h/Maildir
auth_socket_path = /var/run/dovecot/auth-userdb
mail_plugin_dir = /usr/lib/dovecot
mail_plugins = $mail_plugins
10-master.conf
$ grep -v "#" /etc/dovecot/conf.d/10-master.conf

service imap-login {  inet_listener imap {  }  inet_listener imaps {  }}
service pop3-login {  inet_listener pop3 {  }  inet_listener pop3s {  }}
service lmtp {  unix_listener lmtp {  }}
service imap {}
service pop3 {}
service auth {  unix_listener auth-userdb {  }}
service auth-worker {}
service dict {  unix_listener dict {  }}
Dovecot-openssl.cnf
$ grep -v "#" /usr/doc/dovecot-2.0.15/dovecot-openssl.cnf

[ req ]
default_bits = 1024
encrypt_key = yes
distinguished_name = req_dn
x509_extensions = cert_type
prompt = no
[ req_dn ]
C=ID
ST= Indonesia
L=MyCity
O=Dovecot
OU=IMAP server
CN=imap.despro.lan
emailAddress=postmaster@despro.lan
[ cert_type ]
nsCertType = server
$ cd /usr/doc/dovecot-2.0.15/
$ sh mkcert.sh
this action will create /etc/ssl/private/dovecot.pem and /etc/ssl/certs/dovecot.pem have been created. Remember their locations because you have to insert them in 10-ssl.conf
10-ssl.conf
$ grep -v "#" /etc/dovecot/conf.d/10-ssl.conf

ssl_cert =
ssl_key =
20-imap.conf
$ grep -v "#" /etc/dovecot/conf.d/20-imap.conf

protocol imap {mail_plugins = $mail_plugins imap_quota autocreate}
$ grep -v "#" /etc/dovecot/conf.d/20-pop3.conf

protocol pop3 
{mail_plugins = $mail_plugins}
90-plugin.conf
$ grep -v "#" /etc/dovecot/conf.d/90-plugin.conf

plugin 

{    
autocreate = Sent    
autocreate2 = Drafts    
autocreate3 = Junk    
autocreate4 = Trash    
autosubscribe = Sent    
autosubscribe2 = Drafts    
autosubscribe3 = Junk    
autosubscribe4 = Trash
}
90-quota.conf
$ grep -v "#" /etc/dovecot/conf.d/90-quota.conf
plugin {
quota = maildir:User quota
}
auth-system.conf.ext
$ grep -v "#" /etc/dovecot/conf.d/auth-system.conf.ext

passdb {
driver = shadow
}
userdb {
driver = passwd
}
Done

Slackware 13.37 + Dovecot 2.0.15 (POP3 Testing)

This is the way to testing our POP3 installation, every steps should be give correct result.
# telnet localhost 110
# telnet 192.168.110.254 110
# telnet nebula.despro.lan 110
Will given the same results (except IP address and Hostname):
Trying 127.0.0.1...Connected to localhost.Escape character is '^]'.  <-- it means Ctrl + ]+OK Dovecot ready.user fmaster <-- your username+OKpass ******* <-- your password+OK Logged in.quit+OK Logging out.Connection closed by foreign host.
Also check for secure POP connection on port 995
# openssl s_client -connect localhost:995
# openssl s_client -connect 192.168.110.254:995
# openssl s_client -connect nebula.despro.lan:995
Will given same result :
CONNECTED(00000003)
---
---
+OK Dovecot ready.
quit
+OK Logging out
closed
Done

for more advanced testing methode, please take a look these references

ReferensiReferensi 01 Referensi 02

sSMTP di CentOS 6.0 (64 Bit) and Slackware 14.0

untuk melakukan instalasi sSMTP di CentOS lakukan dengan cara :
yum install ssmtp
setelah selesai instal, lakukan editing terhadap file configurasinya :
mcedit /etc/ssmtp/ssmtp.conf
dan isikan dengan
root=username@gmail.com
mailhub=smtp.gmail.com:587
rewriteDomain=
hostname=username@gmail.com
UseSTARTTLS=YES
AuthUser=username
AuthPass=password
FromLineOverride=YES
Testing
Create message.txt with and fill with
Subject: Message for you

Message text starts here.

and run ssmtp with bellow command and check your inbox :D
ssmtp diantokam@slackware.com < /tmp/ssmtp.txt

Tuesday, December 13, 2011

PostgreSQL 9.0.4 with Slackware 13.37

PostgreSQL is an advanced object-relational database management system (ORDBMS) based on POSTGRES. With more than 15 years of development history, it is quickly becoming the de facto database for enterprise level open source solutions. This build includes full text search support (tsearch2).
Home: http://www.postgresql.org.
Repository: Slackers
Download size: 4,26 MB
Installed size: 22,48 MB
Package filename: postgresql-9.0.4-i686-1cf.txz
Step 1: Download postgresql-9.0.4-i686-1cf.txz for Slackware 13.37 from here and install it.
#installpkg postgresql-9.0.4-i686-1cf.txz
Step 2: Create postgreSQL user account
# adduser postgres# passwd postgresChanging password for user postgres.New UNIX password:Retype new UNIX password:passwd: all authentication tokens updated successfully.